# Jose Luis Hernando — full content dump
> Technical SEO consultant and automation specialist in Madrid, partnering with teams to unlock organic growth.
This file concatenates the full text of every blog post on jlhernando.com so an AI agent can load the site in one fetch. Each post is delimited by a Markdown level-2 heading containing the title, the canonical URL, and the publish date. Spec: .
Site author: Jose Luis Hernando Sanz — Technical SEO consultant based in Madrid, currently leading SEO at Adevinta. Speaker at brightonSEO. Builder of open-source SEO tools and Chrome extensions.
- Canonical home: https://jlhernando.com/
- Sitemap: https://jlhernando.com/sitemap.xml
- Concise index (recommended for short context windows): https://jlhernando.com/llms.txt
- Person schema (JSON-LD): https://jlhernando.com/schema/schema-person.json
---
## Intro to Google Apps Script for SEOs
- URL: https://jlhernando.com/blog/intro-google-apps-script-seo/
- Markdown source: https://jlhernando.com/blog/intro-google-apps-script-seo.md
- Published: 2026-03-17
- Summary: Google Apps Script picks up where spreadsheet formulas stop. A beginner's guide for SEOs who want to automate inside Google Sheets.
At some point, every SEO spreadsheet hits a wall. Formulas too long to read, data too fragile to maintain, teammates too scared to touch anything. Apps Script turns that same spreadsheet into Google Sheets on steroids. And with tools like [ChatGPT](https://chat.openai.com/) and [Claude](https://claude.ai/), you don't even need to write the scripts yourself.
You don't need to learn Python. You don't need a terminal. Yes, Apps Script is JavaScript, so there's a language to pick up. The difference is that AI can handle most of the writing for you. Describe what you want, paste the result into your Sheet, and iterate from there.
Open your [Google Sheet](https://docs.google.com/spreadsheets/create), go to **Extensions > Apps Script**, and paste this and hit on the save icon or Ctrl + S / Cmd + S:
```js
/** @customfunction */
function DOMAIN(url) {
return url.split('//')[1].split('/')[0];
}
```
Go back to your sheet and type `=DOMAIN(A2)`. That's it. A readable, reusable formula that extracts the domain from any URL. No terminal, no packages, no setup.
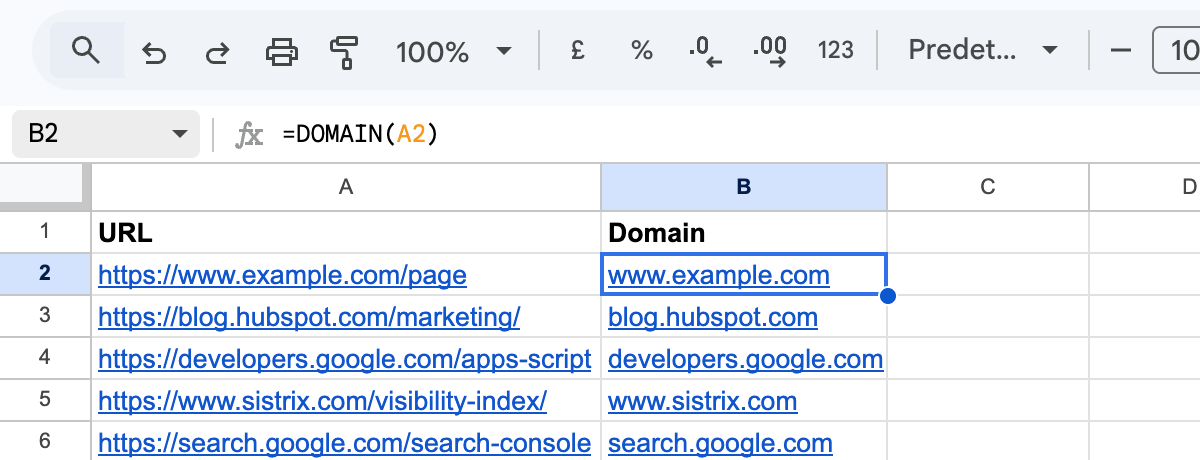
That's [Google Apps Script](https://developers.google.com/apps-script). It runs inside Google Sheets, it's JavaScript, and if you've ever edited a GTM tag or opened Chrome DevTools, you already know the basics.
## What makes it different from learning Python or pure JavaScript?
### You already know the environment
Google Sheets is the SEO industry's universal tool. Everyone uses it. Apps Script simply extends what you're already comfortable with. You're not learning a new platform. You're adding superpowers to the one you already have.
### Zero setup, really
There's nothing to install. No Node.js, no pip, no IDE, no terminal. Open a Google Sheet, click Extensions > Apps Script, and you have a code editor. Save your script, click Run. That's the entire workflow.
### It goes beyond custom formulas
Apps Script has native access to the entire Google ecosystem without any API keys, OAuth configuration, or HTTP clients:
- **[Sheets](https://developers.google.com/apps-script/reference/spreadsheet)** - Read and write data, create formulas, format cells
- **[BigQuery](https://developers.google.com/apps-script/advanced/bigquery)** - Query your GA4 or Search Console bulk exports directly
- **[Gmail](https://developers.google.com/apps-script/reference/gmail)** - Send automated reports, parse incoming emails
- **[Drive](https://developers.google.com/apps-script/reference/drive)** - Create, move, and organize files programmatically
- **[Docs](https://developers.google.com/apps-script/reference/document)** - Generate reports, fill templates, extract text
- **[Slides](https://developers.google.com/apps-script/reference/slides)** - Generate presentation decks from data
- **[Google Ads](https://developers.google.com/google-ads/scripts/docs/overview)** - Automate campaign management, reporting, and bid adjustments
- **[Calendar](https://developers.google.com/apps-script/reference/calendar)** - Schedule events, set reminders
Want to email your team a summary of the data in your sheet? Five lines:
```js
function emailReport() {
const sheet = SpreadsheetApp.getActiveSheet();
const [headers, values] = sheet.getRange('A1:E2').getValues();
const summary = headers.map((h, i) => h + ': ' + values[i]).join('\n');
GmailApp.sendEmail('team@company.com', 'Weekly SEO Report', summary);
}
```
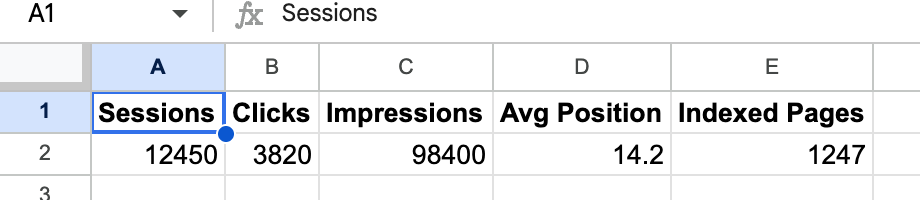
Want to pull data from BigQuery and write it to a Sheet? A few lines:
```js
const results = BigQuery.Jobs.query({ query: 'SELECT * FROM dataset.table LIMIT 10', useLegacySql: false }, 'your-project-id');
const rows = results.rows.map(row => row.f.map(cell => cell.v));
SpreadsheetApp.getActiveSheet().getRange(1, 1, rows.length, rows[0].length).setValues(rows);
```
No API keys. No authentication setup. It just works because you're already signed into Google.
### Scheduling and sharing just work
Need a script to run every Monday morning? Go to **Triggers** in the Apps Script editor, set a time-based trigger, and you're done. No cron jobs, no cloud functions, no server to maintain.
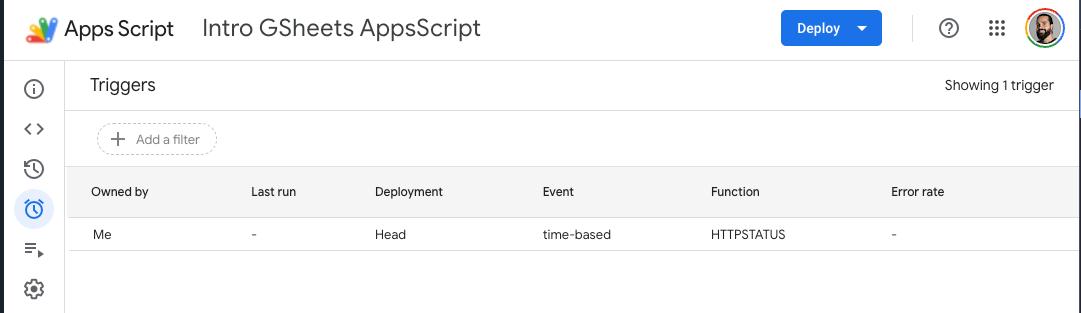
Want your team to use your tool? Share the Google Sheet. They don't need to install anything, configure credentials, or even understand that there's code behind it. They just open the spreadsheet and use it.
## What can you actually build with this?
At Adevinta, I used Apps Script to pull [Sistrix](https://www.sistrix.com/) visibility data weekly, compare trends across multiple markets, and email formatted reports to stakeholders. No servers, no cron jobs. Just a Google Sheet and a time-based trigger. That's the kind of thing Apps Script is built for.
Here are more examples of what SEOs build with it.
### Automated weekly reports
Pull Search Console or GA4 data from BigQuery every Monday, calculate week-over-week trends, format the results in a clean sheet, and email a summary to stakeholders. All on autopilot.
### Bulk URL processing
Read a list of URLs from column A, fetch each page, extract titles and meta descriptions, and write the results back to the sheet. Your team gets a live content inventory they can filter and sort.
### Custom Sheets formulas
Build functions your team can use like native formulas. For a full collection of 16 ready-to-use formulas (URL parsing, content auditing, redirect checking, and more), see [16 Custom Formulas That Will Make You Ditch Excel for Apps Script](/blog/apps-script-formulas-seo/).
```js
/**
* Returns the HTTP status code for a URL
* @param {string} url The URL to check
* @return {number} HTTP status code
*/
function HTTPSTATUS(url) {
const response = UrlFetchApp.fetch(url, { muteHttpExceptions: true, followRedirects: false });
return response.getResponseCode();
}
```
Since this uses `UrlFetchApp` to make network requests, it can't run as a cell formula (Google restricts network calls in custom functions). Instead, call it from a [custom menu](#your-first-script) or trigger. Your colleagues still don't need to know how it works.
### Alert systems
Monitor your key pages daily. If a page returns a 5xx error, ranking data drops below a threshold, or a competitor makes a change, trigger an email or Slack notification.
### Data pipelines
Connect multiple Google services in sequence: query BigQuery for yesterday's Search Console data, compare it against last week, generate a Slides deck with the highlights, and email it to your manager. All from a single script.
## Getting started
### Your first script
Open your [Google Sheet](https://docs.google.com/spreadsheets/create), go to **Extensions > Apps Script**, and paste this and hit on the save icon or Ctrl + S / Cmd + S:
```js
function onOpen() {
SpreadsheetApp.getUi()
.createMenu('🤖 SEO Tools')
.addItem('Say hello', 'sayHello')
.addToUi();
}
function sayHello() {
SpreadsheetApp.getUi().alert('Apps Script is working!');
}
```
Go back to your sheet and refresh the page. You'll see a new "SEO Tools" menu. Click it and select "Say hello."

That's it. You just built your first Apps Script automation.
### Four ways to run a script
1. **Script editor "Run" button.** Click the play icon in the Apps Script editor. Best for testing.
2. **Custom menu.** Use an `onOpen` trigger to add menu items to your sheet (like the example above). Best for tools your team will use.
3. **Custom function.** Call your function directly from a cell with `=myFunction()`. Best for formulas that process data.
4. **Time-based trigger.** Schedule scripts to run automatically (hourly, daily, weekly). Best for reports and monitoring.
### Resources to keep going
- [Official Apps Script documentation](https://developers.google.com/apps-script) - The reference for all built-in services
- [Apps Script quickstarts](https://developers.google.com/apps-script/quickstart) - Guided tutorials from Google
- [Dave Sottimano's Tech SEO Boost talk](https://www.youtube.com/watch?v=voCyYmcdGP0) - Excellent walkthrough of Apps Script for SEO
## The limitations (and workarounds)
Apps Script isn't perfect. Here's what to watch out for.
**Execution time limits.** Scripts can run for up to 6 minutes on free accounts (30 minutes on [Google Workspace](https://workspace.google.com/)). For large datasets, you'll need to batch your work across multiple runs.
**API quotas.** There are daily limits on how many emails you can send, how many URL fetches you can make, and how much BigQuery data you can process. Check the [quotas page](https://developers.google.com/apps-script/guides/services/quotas) to plan accordingly.
**The editor is basic.** The built-in code editor gets the job done, but it's no VS Code. For larger projects, use [clasp](https://developers.google.com/apps-script/guides/clasp) to develop locally and push to Apps Script. I wrote about how [Claude Code completely changed my Apps Script workflow](/blog/claude-code-apps-script-seo/) for exactly this reason.
**It's not full JavaScript.** Apps Script runs on a modified V8 engine, but it doesn't support everything standard JavaScript offers. There's no `import`/`export`, no `fetch()` (you use `UrlFetchApp` instead), and some newer JS features may not be available. On the flip side, Apps Script provides built-in services like `SpreadsheetApp`, `GmailApp`, and `DriveApp` that don't exist in regular JavaScript. Think of it as JavaScript tailored for Google's ecosystem. If you already know JavaScript, you'll feel right at home. If Apps Script is your first contact with code, it's a solid stepping stone to learning JavaScript more broadly.
## None of that should stop you
Apps Script sits in a sweet spot. It's accessible enough for someone who's never written code before, and powerful enough to build real production workflows.
If you've been wanting to start automating SEO tasks but felt overwhelmed by Python setups or Node.js configuration, this is your on-ramp. Open a Sheet, write a function, and see what happens.
If writing code isn't your thing, [Unlimited Sheets](https://unlimitedsheets.com/) by [Nacho Mascort](https://www.linkedin.com/in/nachomascort/) packs really good SEO functionalities out of the box into a Sheets add-on. Plug and play.
---
Have questions or want to share what you've built? Find me on 𝕏 [@jlhernando](https://x.com/jlhernando) or [LinkedIn](https://www.linkedin.com/in/jose-luis-hernando-sanz/).
---
## Migrate GSC Bulk Export Without Losing Data
- URL: https://jlhernando.com/blog/gsc-bulk-export-migration/
- Markdown source: https://jlhernando.com/blog/gsc-bulk-export-migration.md
- Published: 2026-03-08
- Summary: Move your Search Console bulk data export to a new BigQuery project. Dataset setup, table copy, and service account permissions with zero gaps.
I've been running Google Search Console's [bulk data export](https://support.google.com/webmasters/answer/12918484) pretty much since day one. Google launched it in 2023 and I set it up almost immediately. Raw Search Console data in BigQuery is incredibly useful, and once you have it running you kind of forget it's there.
**Until you need to move it.**
[Adevinta sold its Spanish business to EQT](https://www.reuters.com/markets/deals/adevinta-sells-its-spanish-business-swedens-eqt-23-billion-2025-07-21/), and suddenly we had to migrate everything to new GCP projects. Every dataset, every export. And obviously, losing years of Search Console data was not an option.
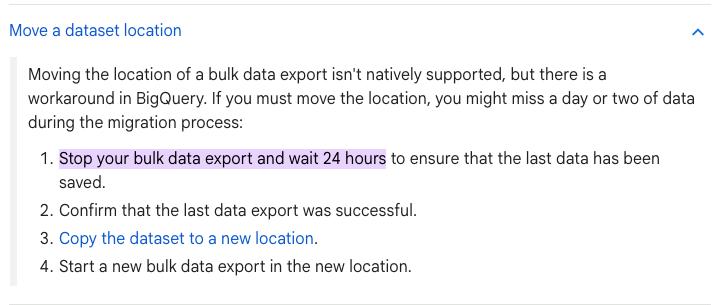
I couldn't find anything on Google's official documentation covering migrating a bulk data export to a different GCP project. The closest reference is their guide on [moving a dataset location](https://support.google.com/webmasters/answer/12919198#zippy=%2Cmove-a-dataset-location:~:text=Stop%20your%20bulk%20data%20export%20and%20wait%2024%20hours), which recommends stopping the export, waiting 24 hours, and then copying the dataset. That's a full day of Search Console data potentially gone.
We tried a different method that migrates everything without losing a single day of data. This guide walks through the full process we followed.
## Prerequisites
Before you start, make sure you have:
- **Owner or admin access** to both the source and destination GCP projects
- The **`bq` command-line tool**. You don't need to install anything on your machine. Just open [Cloud Shell](https://shell.cloud.google.com/) in Google Cloud Platform and you'll have `bq` and `gcloud` ready to go.

- **Verified ownership** of the Search Console property you're exporting
## Step 1: Create the destination project and dataset
You need two things in place in BigQuery:
- A **project** (the top-level GCP container).
- A **dataset** (where the actual tables will live inside that project).
If the destination project doesn't exist yet, create it in the [GCP Console](https://console.cloud.google.com/projectcreate) or via `gcloud`:
```bash
gcloud projects create adevinta-spain-abc12 --name="Adevinta Spain"
```
Then create a dataset inside that project.
```bash
bq mk --dataset adevinta-spain-abc12:searchconsole_dataset
```
Here `adevinta-spain-abc12` is the project ID, and `searchconsole_dataset` is the dataset name where your export tables will live.
A few things to note:
- Since we stayed in the same region, we didn't need the `--location` flag because BigQuery automatically matches the source and destination locations. If you ever have to change regions, just take into account that it becomes a transfer with egress costs rather than an instant copy. Also, once a dataset location is set, it is permanent.
- Dataset names can only contain letters, numbers, and underscores.
## Step 2: Check the ExportLog before copying
Before copying anything, check the `ExportLog` table in the source dataset to confirm that today's export has already run. The key is **making sure that on the day you're migrating, the data has already been inserted**. This way you're not catching the export mid-write, and your copy will include the most recent data.
```sql
SELECT *
FROM `old-project-id.searchconsole.ExportLog`
ORDER BY data_date DESC
LIMIT 5
```
Look at the `data_date` and `publish_time` columns. The `data_date` tells you which day's data was exported, and `publish_time` tells you when it was written to BigQuery. Once you see that both `SEARCHDATA_SITE_IMPRESSION` and `SEARCHDATA_URL_IMPRESSION` have been exported for the day you want to start the migration, you're safe to proceed.
## Step 3: Copy the historical data
Every bulk data export creates three tables:
1. **`searchdata_site_impression`** — site-level impression and click data (aggregated by property).
2. **`searchdata_url_impression`** — URL-level impression and click data (broken down by page).
3. **`ExportLog`** — logs of each export run. Useful for debugging but optional to migrate.
You need to copy at least the first two. The `bq cp` command handles this. Adding `--nosync` runs the copy as an async job, which is useful for large tables.
Start with the site-level impressions table, which contains aggregated data per property:
```bash
bq --nosync cp \
old-project-id:searchconsole.searchdata_site_impression \
adevinta-spain-abc12:searchconsole_dataset.searchdata_site_impression
```
Then copy the URL-level impressions table, which has the per-page breakdown:
```bash
bq --nosync cp \
old-project-id:searchconsole.searchdata_url_impression \
adevinta-spain-abc12:searchconsole_dataset.searchdata_url_impression
```
Finally, the export log. This one is optional but handy for debugging if something goes wrong later:
```bash
bq --nosync cp \
old-project-id:searchconsole.ExportLog \
adevinta-spain-abc12:searchconsole_dataset.ExportLog
```
Depending on how much data you have, each copy could take a few minutes. You can check the job status in the [BigQuery console](https://console.cloud.google.com/bigquery) or by running:
```bash
bq ls -j --project_id=adevinta-spain-abc12
```
## Step 4: Grant permissions to the GSC service account
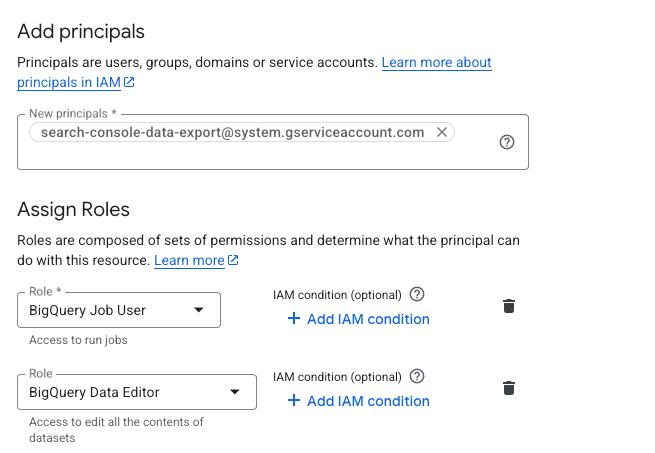
For Search Console to continue writing data to the new dataset, you need to grant its service account the right permissions. The service account used by GSC bulk export is:
```
search-console-data-export@system.gserviceaccount.com
```
Grant it two IAM roles on the destination project:
1. **BigQuery Job User** (`roles/bigquery.jobUser`). Allows it to run export jobs.
2. **BigQuery Data Editor** (`roles/bigquery.dataEditor`). Allows it to write data to tables.
You can do this via the [IAM console](https://console.cloud.google.com/iam-admin/iam) or with `gcloud` in Cloud Shell:
```bash
gcloud projects add-iam-policy-binding adevinta-spain-abc12 \
--member="serviceAccount:search-console-data-export@system.gserviceaccount.com" \
--role="roles/bigquery.jobUser"
gcloud projects add-iam-policy-binding adevinta-spain-abc12 \
--member="serviceAccount:search-console-data-export@system.gserviceaccount.com" \
--role="roles/bigquery.dataEditor"
```
## Step 5: Update the export settings in Search Console
Go to [Search Console](https://search.google.com/search-console/) and navigate to **Settings > Bulk data export**. Update the BigQuery project and dataset to point to the new destination.
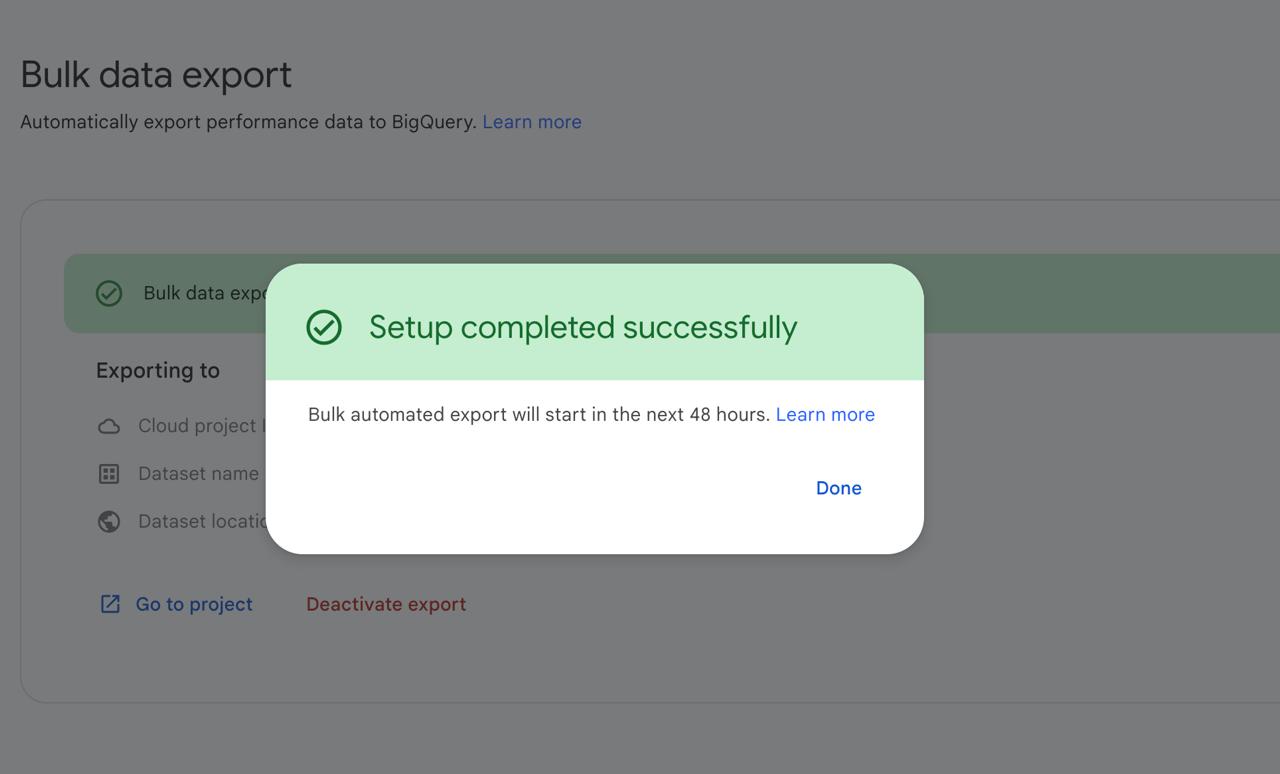
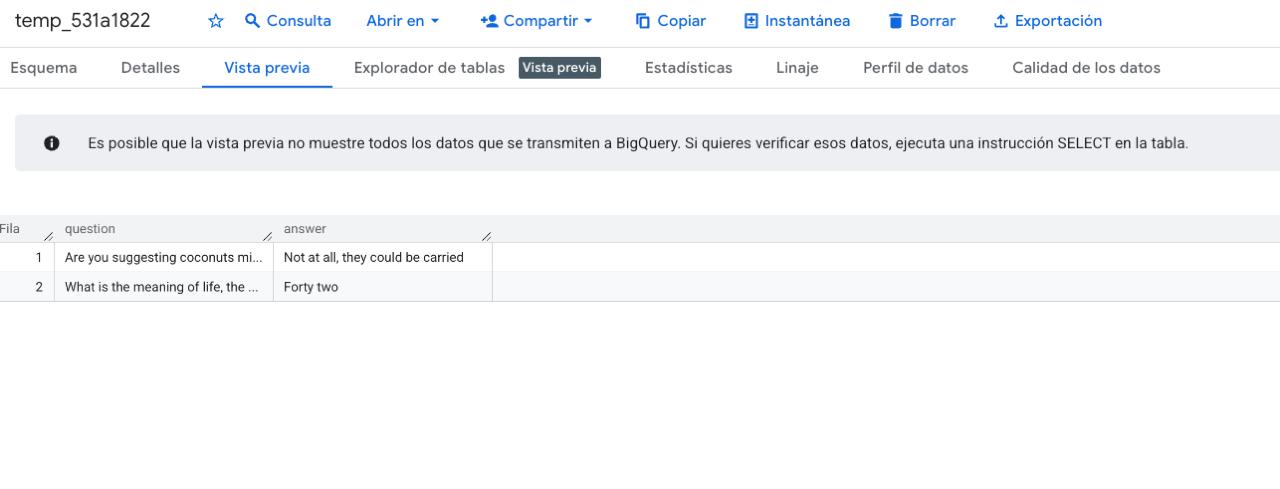
Fun detail: when Search Console tests the connection to your new dataset, it creates a temporary table with some easter eggs. Monty Python's [coconut debate](https://youtube.com/clip/UgkxzK9Y38W0_iLwraJMK9S3VzDRIR5aXtYI?si=l7fuhIOU468zN5lU) and The Hitchhiker's Guide to the Galaxy's "forty two." You'll see it appear briefly in BigQuery before it gets cleaned up.
After saving, Search Console will start writing new data to the new dataset. Combined with the historical data you copied in Step 3, you'll have a complete, uninterrupted dataset with zero data gaps.
## Step 6: Verify the migration
Give it a day or two, then check that new data is flowing:
```sql
SELECT MAX(data_date) AS latest_date
FROM `adevinta-spain-abc12.searchconsole_dataset.searchdata_site_impression`
```
If the latest date is recent, the export is working. You should also spot-check a few metrics against the original dataset to make sure the historical copy is complete.
## Common issues
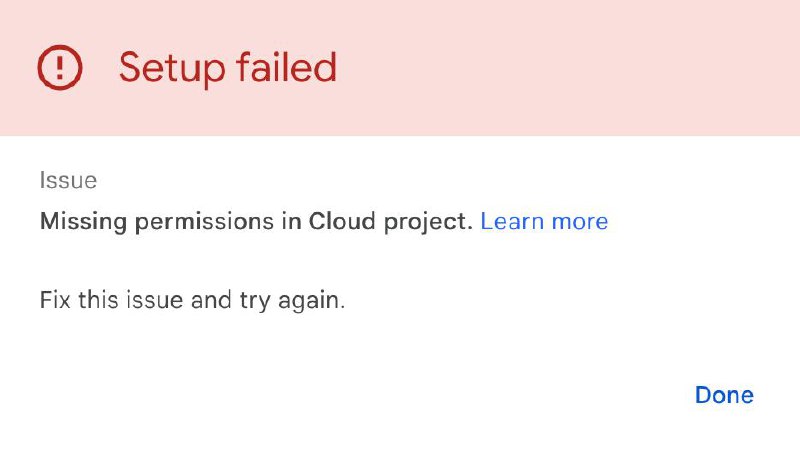
**"Permission denied" errors after updating the export:**
Double-check that the service account has both roles (Job User and Data Editor) on the new project, not just the dataset.
## Big Thanks
Big thanks to the data engineering team at Adevinta Motor for figuring this out together: [Ibai Barberena](https://www.linkedin.com/in/ibai-barberena/), [Ismael Arab Garcia](https://www.linkedin.com/in/ismael-arab-garcia-218965165/), and [Rafael Baena](https://www.linkedin.com/in/rafael-baena-531159b3/). Hopefully this guide and our experience is useful to someone in the same situation as us.
---
## How to Use JavaScript to Automate SEO
- URL: https://jlhernando.com/blog/javascript-seo-automation/
- Markdown source: https://jlhernando.com/blog/javascript-seo-automation.md
- Published: 2026-02-23
- Summary: How SEOs can use JavaScript to automate repetitive tasks, extract data at scale, and build custom tools. From browser consoles to cloud functions.
Programming and automation are increasingly popular in SEO, and for good reason. The real benefit isn't just saving time. It's freeing yourself from repetitive work so you can spend more time thinking.
This article covers why JavaScript is worth learning for SEO, the main paths to start automating, and practical examples to get you going.
## Why JavaScript for SEO?
A lot of great automation in SEO comes from Python. But JavaScript has unique advantages worth considering.
### 1. To audit JavaScript on websites
Your website almost certainly uses JavaScript, whether it's a full framework like [React](https://react.dev/) or [Next.js](https://nextjs.org/), or just analytics and consent scripts. Learning the language gives you a stronger foundation to understand how JS might be affecting organic performance.
### 2. To understand new web technologies
The web development ecosystem moves fast, and JavaScript is at the center of it. Learning it helps you understand technologies like [service workers](https://developer.mozilla.org/en-US/docs/Web/API/Service_Worker_API), edge rendering, and streaming SSR, all of which can directly affect SEO.
### 3. To use tools like Google Tag Manager
Tag management systems like [Google Tag Manager](https://tagmanager.google.com/) use JavaScript to inject code into websites. Knowing the language means you can understand what those tags do, create custom ones, and debug problems when things break.
### 4. To build your own websites and experiments
One of the best things about learning JavaScript is that you can build websites as side projects or testing grounds for SEO experiments. There's no better way to understand something than getting your hands dirty.
## Paths to JavaScript SEO Automation
JavaScript now runs everywhere. For SEO automation, there are two classic environments and one alternative that deserves its own section:
- **In the browser** (front-end)
- **On your computer or a server** (back-end, using [Node.js](https://nodejs.org/))
- **Inside Google Sheets** (via [Google Apps Script](https://developers.google.com/apps-script))
### Browser-Based Automation
You don't need to install anything to get started. Browsers already run JavaScript.
**The Browser Console**
The simplest entry point is your browser's DevTools console. For example, you can make any website editable:
```js
document.body.contentEditable = true
```
Useful for mocking up new content or headings to show clients.
**Chrome Snippets**
If you use Chrome, [Snippets](https://developer.chrome.com/docs/devtools/javascript/snippets/) offer a more user-friendly way to save and run custom scripts. You can create, edit, and execute them right from DevTools.
For example, I built a Snippet that counts all crawlable links on a page and downloads the list as a CSV. You can [grab the code from GitHub](https://github.com/jlhernando/chrome-snippets/blob/master/link-counter.js).
**Chrome Extensions**
Chrome extensions let you build reusable tools that run on specific pages. I've built a few, including the [GSC Index Coverage Extractor](/blog/gsc-index-coverage-extractor/) and the [Search Console Compare Overlay](/blog/search-console-compare-extension/). They use the same JavaScript you already know, plus a few browser APIs for tabs, storage, and content injection.
For heavier automation, you'll want Node.js.
### Back-End Automation with Node.js
[Node.js](https://nodejs.org/) lets you run JavaScript on your computer without a browser. Once installed, you can write scripts that interact with APIs, scrape websites, process files, and much more.
If you need help getting started, I wrote a guide on [how to install Node.js for SEO](/blog/how-to-install-node-for-seo/).
Here are the areas where I see SEO professionals getting the most value from Node.js.
**Extracting Data from APIs**
Collecting data from different sources is one of the most common SEO tasks. Since Node 18+, you can use the native `fetch` API without extra dependencies:
```js
const getPageSpeedData = async (url) => {
const endpoint = 'https://www.googleapis.com/pagespeedonline/v5/runPagespeed';
const key = 'YOUR-GOOGLE-API-KEY';
const response = await fetch(`${endpoint}?url=${url}&key=${key}`);
const data = await response.json();
console.log(data);
return data;
};
getPageSpeedData('https://www.searchenginejournal.com/');
```
For a more complete example, check out [this script](https://github.com/jlhernando/google-pagespeed-bulk) that uses Google's PageSpeed API to extract Core Web Vitals data in bulk.
**Scraping Websites**
For basic HTML scraping, [Cheerio](https://cheerio.js.org/) combined with `fetch` works well:
```js
import * as cheerio from 'cheerio';
const getTitle = async (url) => {
const response = await fetch(url);
const html = await response.text();
const $ = cheerio.load(html);
const title = $('title').text();
console.log(title);
return title;
};
getTitle('https://www.searchenginejournal.com/');
```
If you need the fully rendered version of a page (after JavaScript execution), [Playwright](https://playwright.dev/) can launch a headless browser and interact with the DOM just like a real user. It's the go-to tool for browser automation in 2026.
**Processing CSV and JSON Files**
The built-in `fs` module reads and writes files. For CSV, [csv-parse](https://www.npmjs.com/package/csv-parse) and [csv-stringify](https://www.npmjs.com/package/csv-stringify) are lightweight and reliable:
```js
import { readFileSync, writeFileSync } from 'node:fs';
import { parse } from 'csv-parse/sync';
const input = readFileSync('urls.csv', 'utf8');
const records = parse(input, { columns: true });
console.log(records); // Array of objects
```
**Cloud Functions for Serverless Tasks**
Cloud providers like [Google Cloud Functions](https://cloud.google.com/functions), [AWS Lambda](https://aws.amazon.com/lambda/), and [Cloudflare Workers](https://workers.cloudflare.com/) let you run scripts on a schedule without managing a server.
A practical example: schedule a function that extracts Search Console data daily and stores it in BigQuery. No laptop needed, it just runs.
### Google Apps Script as an Alternative Path
[Google Apps Script](https://developers.google.com/apps-script) is arguably the easiest way to start coding for SEO. It runs inside Google Sheets, Docs, and other workspace apps already part of most SEO workflows.
I recently wrote about how [Claude Code transformed my Apps Script workflow](/blog/claude-code-apps-script-seo/). If you work with GSheets-based reporting, it's worth a look.
There are great community projects to learn from, like [Hannah Butler](https://twitter.com/HannahRampton)'s Search Console explorer sheet. [Dave Sottimano](https://twitter.com/dsottimano) also gave an [excellent talk at Tech SEO Boost](https://www.youtube.com/watch?v=voCyYmcdGP0) covering many ways to use Apps Script for SEO.
## Final Thoughts
JavaScript remains one of the [most popular programming languages](https://survey.stackoverflow.co/2025/technology) in the world, and AI-assisted coding tools like [Claude Code](https://claude.ai/code), [Gemini](https://gemini.google.com/), and [ChatGPT Codex](https://openai.com/index/introducing-codex/) have made the barrier to entry lower than ever. Whether you write scripts from scratch or describe what you want in plain English, automating repetitive SEO work is now within reach for everyone.
---
*This article is based on a piece I originally wrote for [Search Engine Journal](https://web.archive.org/web/20210625090123/https://www.searchenginejournal.com/seo-automation-with-javascript/406582/). It has been significantly updated with modern tooling and examples.*
Have questions or want to share your own automation projects? Find me on 𝕏 [@jlhernando](https://x.com/jlhernando) or [LinkedIn](https://www.linkedin.com/in/jose-luis-hernando-sanz/).
---
## GSC Index Coverage Extractor: Bulk Download
- URL: https://jlhernando.com/blog/gsc-index-coverage-extractor/
- Markdown source: https://jlhernando.com/blog/gsc-index-coverage-extractor.md
- Published: 2026-02-23
- Summary: Chrome extension and CLI tool to download all Index Coverage reports from Search Console in one go.
Back in 2021 I wrote about [automating Index Coverage extraction with Node.js](/blog/index-coverage-extractor/). The script worked, but it required installing Node, configuring credentials, and running commands in a terminal. Not everyone's cup of tea.
Since then I've rebuilt the tool from scratch and also created a Chrome extension. The core problem hasn't changed, though.
## The problem
Google Search Console's Index Coverage Report gives you a solid overview of how Google sees your site: how many pages are indexed, how many are excluded, and why.

The top-level summary is useful, but the real value is in the details. Each status (Errors, Valid, Excluded...) breaks down into subcategories that tell you exactly why a URL ended up where it did.

Here's the painful part: if you want to export the actual URLs from those reports, you have to click into each subcategory and download them one by one. If your site has 15 or 20 active reports, that's 15 or 20 manual exports. Every. Single. Time.

## The Chrome Extension
The easiest way to solve this is the [GSC Index Coverage Extractor](https://chromewebstore.google.com/detail/gsc-index-coverage-extrac/difndjfaeoinhbcimnkinlfcbooglbkh) Chrome extension.
Install it, open any Google Search Console property, and let it extract all your Index Coverage reports in one go. No setup, no credentials, no terminal.
[](https://chromewebstore.google.com/detail/gsc-index-coverage-extrac/difndjfaeoinhbcimnkinlfcbooglbkh)
**What it does:**
- **One-click extraction.** Opens each report, extracts the URLs, and moves to the next one automatically.
- **Excel and CSV output.** Get a clean Excel file with a summary tab plus one tab per report, or individual CSV files.
- **Multi-property support.** Select multiple GSC properties and extract them all in a single session.
- **Sitemap Coverage.** Optionally extract coverage data from all your sitemaps too.
- **Configurable pacing.** Adjust the delay between page navigations to avoid rate limits.
- **100% local.** Everything runs in your browser. Your data never leaves your machine.
Since the extension runs directly on the GSC pages you're already logged into, there's no need to configure credentials or deal with API keys.
## The Command Line Tool
If you prefer automation or need to integrate this into a larger workflow, the [CLI version on GitHub](https://github.com/jlhernando/index-coverage-extractor) is the way to go.
It uses Playwright to automate a Chrome browser, logs into GSC, and extracts the same data. The v3 release reduced dependencies, added persistent sessions (so you don't re-authenticate every run), and includes unit tests.
**Key features:**
- Headless or visible browser automation
- Multi-property batch processing
- Terminal UI with progress indicators
- Excel and CSV output
You'll need Node.js installed. Check the [repo README](https://github.com/jlhernando/index-coverage-extractor) for setup instructions.
---
Have questions or feedback? Find me on 𝕏 [@jlhernando](https://x.com/jlhernando) or [LinkedIn](https://www.linkedin.com/in/jose-luis-hernando-sanz/).
---
## Google Index Checker 2.0: Free Webapp + CLI Tool
- URL: https://jlhernando.com/blog/google-index-inspect-v2-webapp/
- Markdown source: https://jlhernando.com/blog/google-index-inspect-v2-webapp.md
- Published: 2026-02-15
- Summary: Rebuilt my bulk Google indexing checker into a proper CLI and a free web app. Check index status without touching a terminal.
Back in January 2022, I published a [script to check indexing status in bulk](/blog/google-url-inspection-api-nodejs/) using Google's then-new URL Inspection API endpoint. It was very much an MVP. A single `index.js` file that read a CSV, called the API, and dumped results into a folder. It did the job, but let's be honest… It was scrappy.
Four years later, **that repo has been one of the things I kept meaning to revisit**. I've learned a few more things in the meantime and I know some people wanted to use it but didn't feel comfortable with the terminal.
So I finally sat down and did two things: **rewrote the CLI from scratch** and **built a free web app** so anyone can check their Google indexing status without touching a terminal.
## The web app: no setup, no terminal, no barriers
Let me start with the part most of you will care about.
**[Free Google Index Checker Tool](https://jlhernando.com/tools/free-bulk-google-index-inspect/)**
It's live, it's free, and it runs entirely in your browser.
[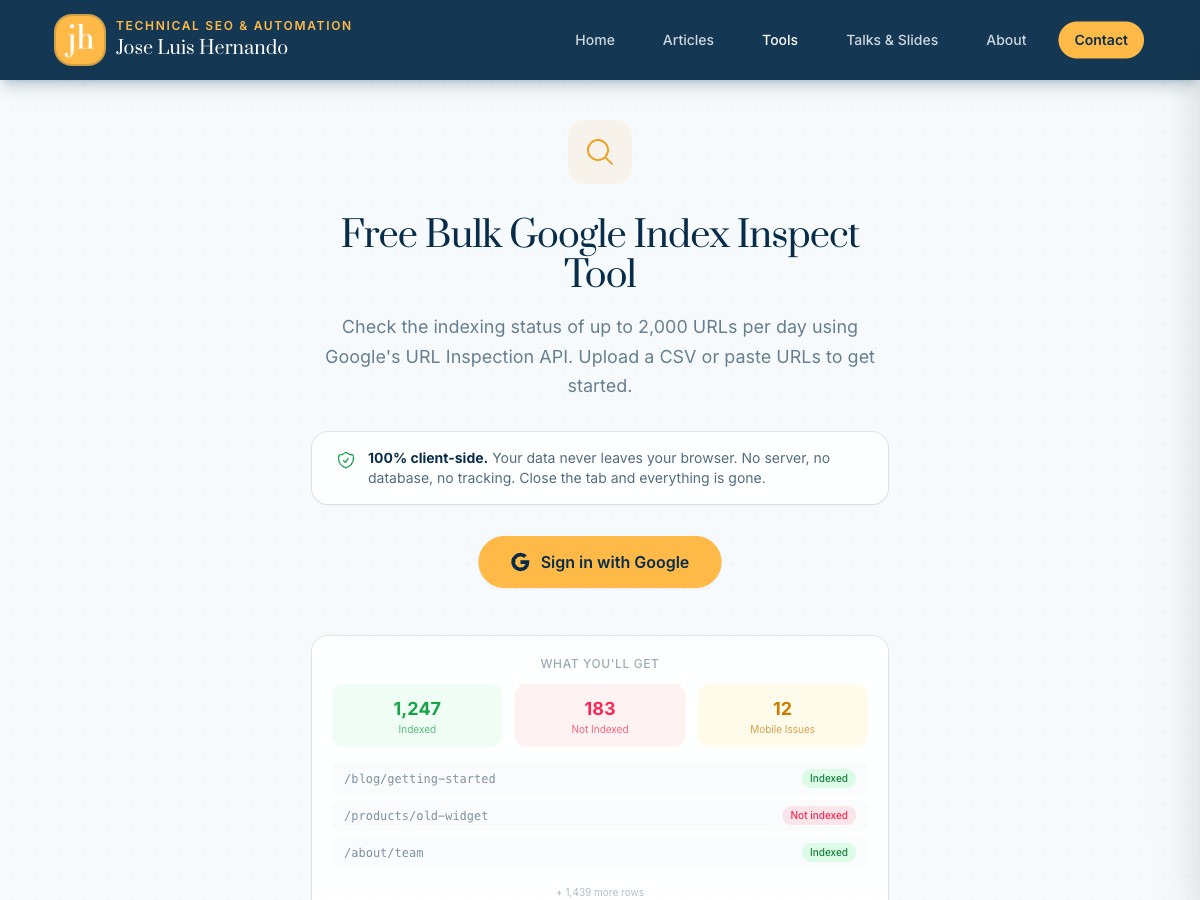](https://jlhernando.com/tools/free-bulk-google-index-inspect/)
The flow is dead simple:
1. **Sign in with Google** with the same account you use for Search Console.
2. **Upload your URLs + property** in a CSV or pasting them directly.
3. **See or Download your results** as Excel, CSV, or JSON
That's it. No Node.js, no cloning repos, no `npm install`, no OAuth credentials to set up. You sign in, upload your URLs, and get your indexing data back.
### Your data stays in your browser
This was important to me. The webapp is **100% client-side**. Your URLs, your Google credentials, your results... none of it touches a server. The API calls happen directly from your browser to Google's servers. No database, no tracking, no server logs.
### Who is this for?
If you work in SEO and need to **check whether Google has indexed a batch of URLs** (after a migration, a new section launch, or just a routine audit) this is for you. Especially if the idea of opening a terminal makes you uncomfortable. No judgement, I get it. Not everyone needs to be a command-line person.
You still get the same 2,000 URL daily limit from Google's API (bummer), but at least the setup barrier is gone.
### It ended up with way more features than I expected
What started as a simple *"upload, inspect, download"* tool kept growing. Once I had the basics working, I kept thinking **"what would actually make this useful day to day?"** and adding things.
When you sign in, the app pulls your Search Console properties automatically, so if you're pasting URLs manually you just pick the property from a dropdown instead of typing out `sc-domain:example.com` or whatever format Google expects. Small thing, but it removes a bit of friction.
While the inspection runs, you get a progress bar with an ETA and a live count of indexed vs not-indexed URLs. You can pause, resume, or hit Esc to cancel if something looks off. And if your browser crashes mid-run (it happens), the app checkpoints your progress locally. Next time you open it, it asks if you want to pick up where you left off instead of starting from scratch.
[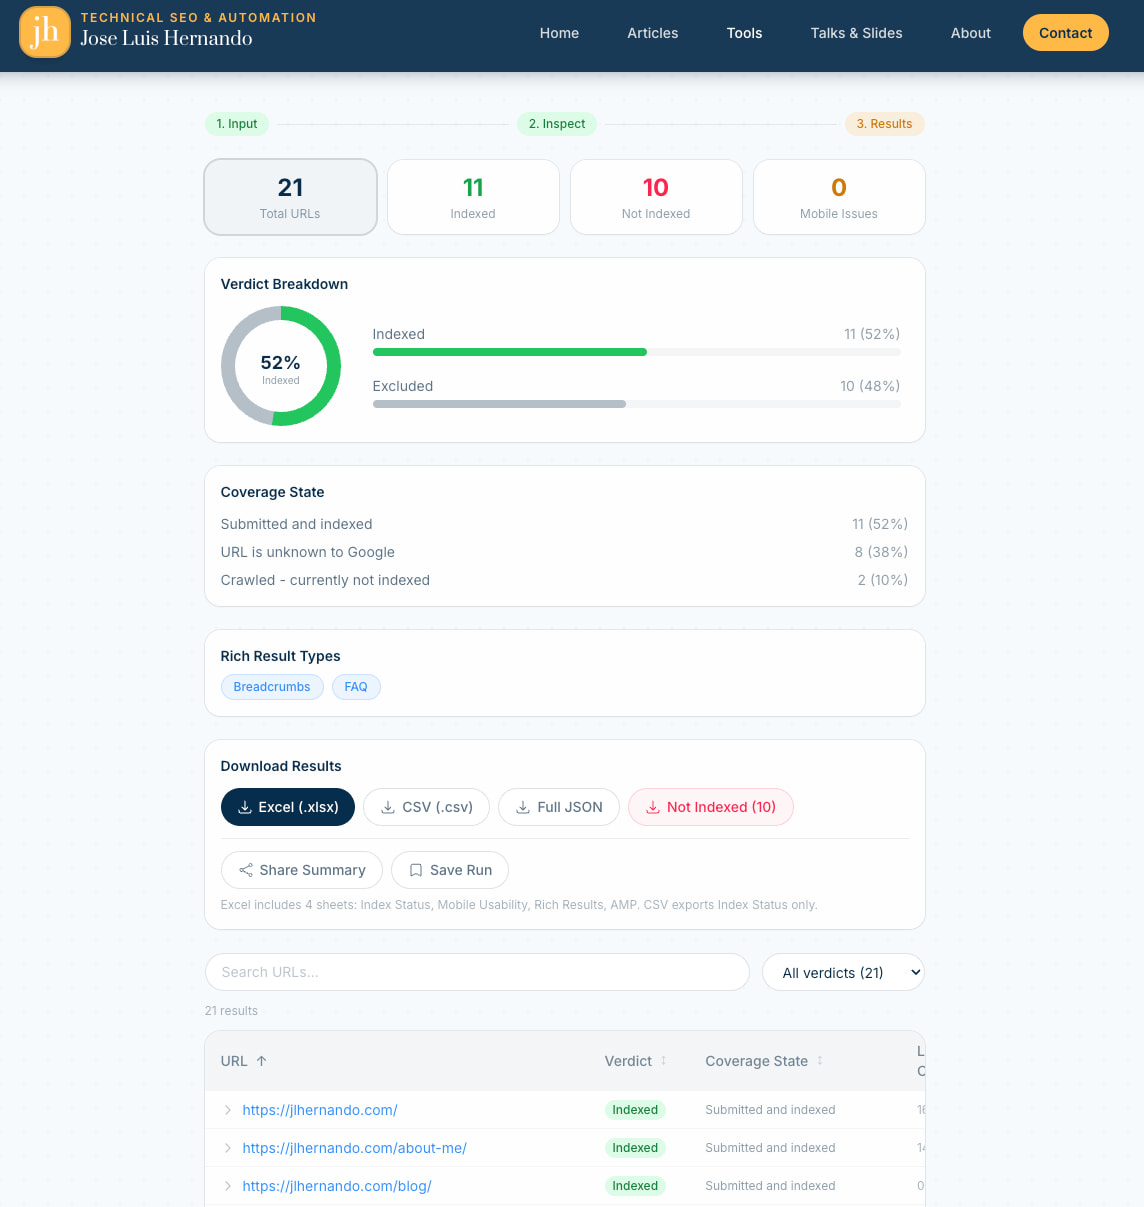](https://jlhernando.com/tools/free-bulk-google-index-inspect/)
The results page is where I spent the most time. There's a donut chart and summary cards at the top showing the breakdown by verdict. You can click any card to filter the table instantly.
Each row expands to **show the full index inspection response**: coverage state, last crawl time, robots status, canonical URL, the lot. And if you just want the problem URLs, there's a one-click download that exports only the not-indexed ones.
Two features I'm particularly happy with: you can generate a **shareable summary link** that encodes the aggregate stats (no raw URLs) so you can send it to a client without exposing the full data. And you can **save runs and compare them** side by side to see which URLs gained or lost indexing between inspections. Really useful after you've submitted fixes and want to check progress a week later.
## The CLI rewrite: from MVP to proper tool
For those of you who do live in the terminal, the [CLI version](https://github.com/jlhernando/google-index-inspect-api) also got a complete rewrite.
The original was a single file. It worked, but it was simple and fragile.
Here's what the v2 looks like:
[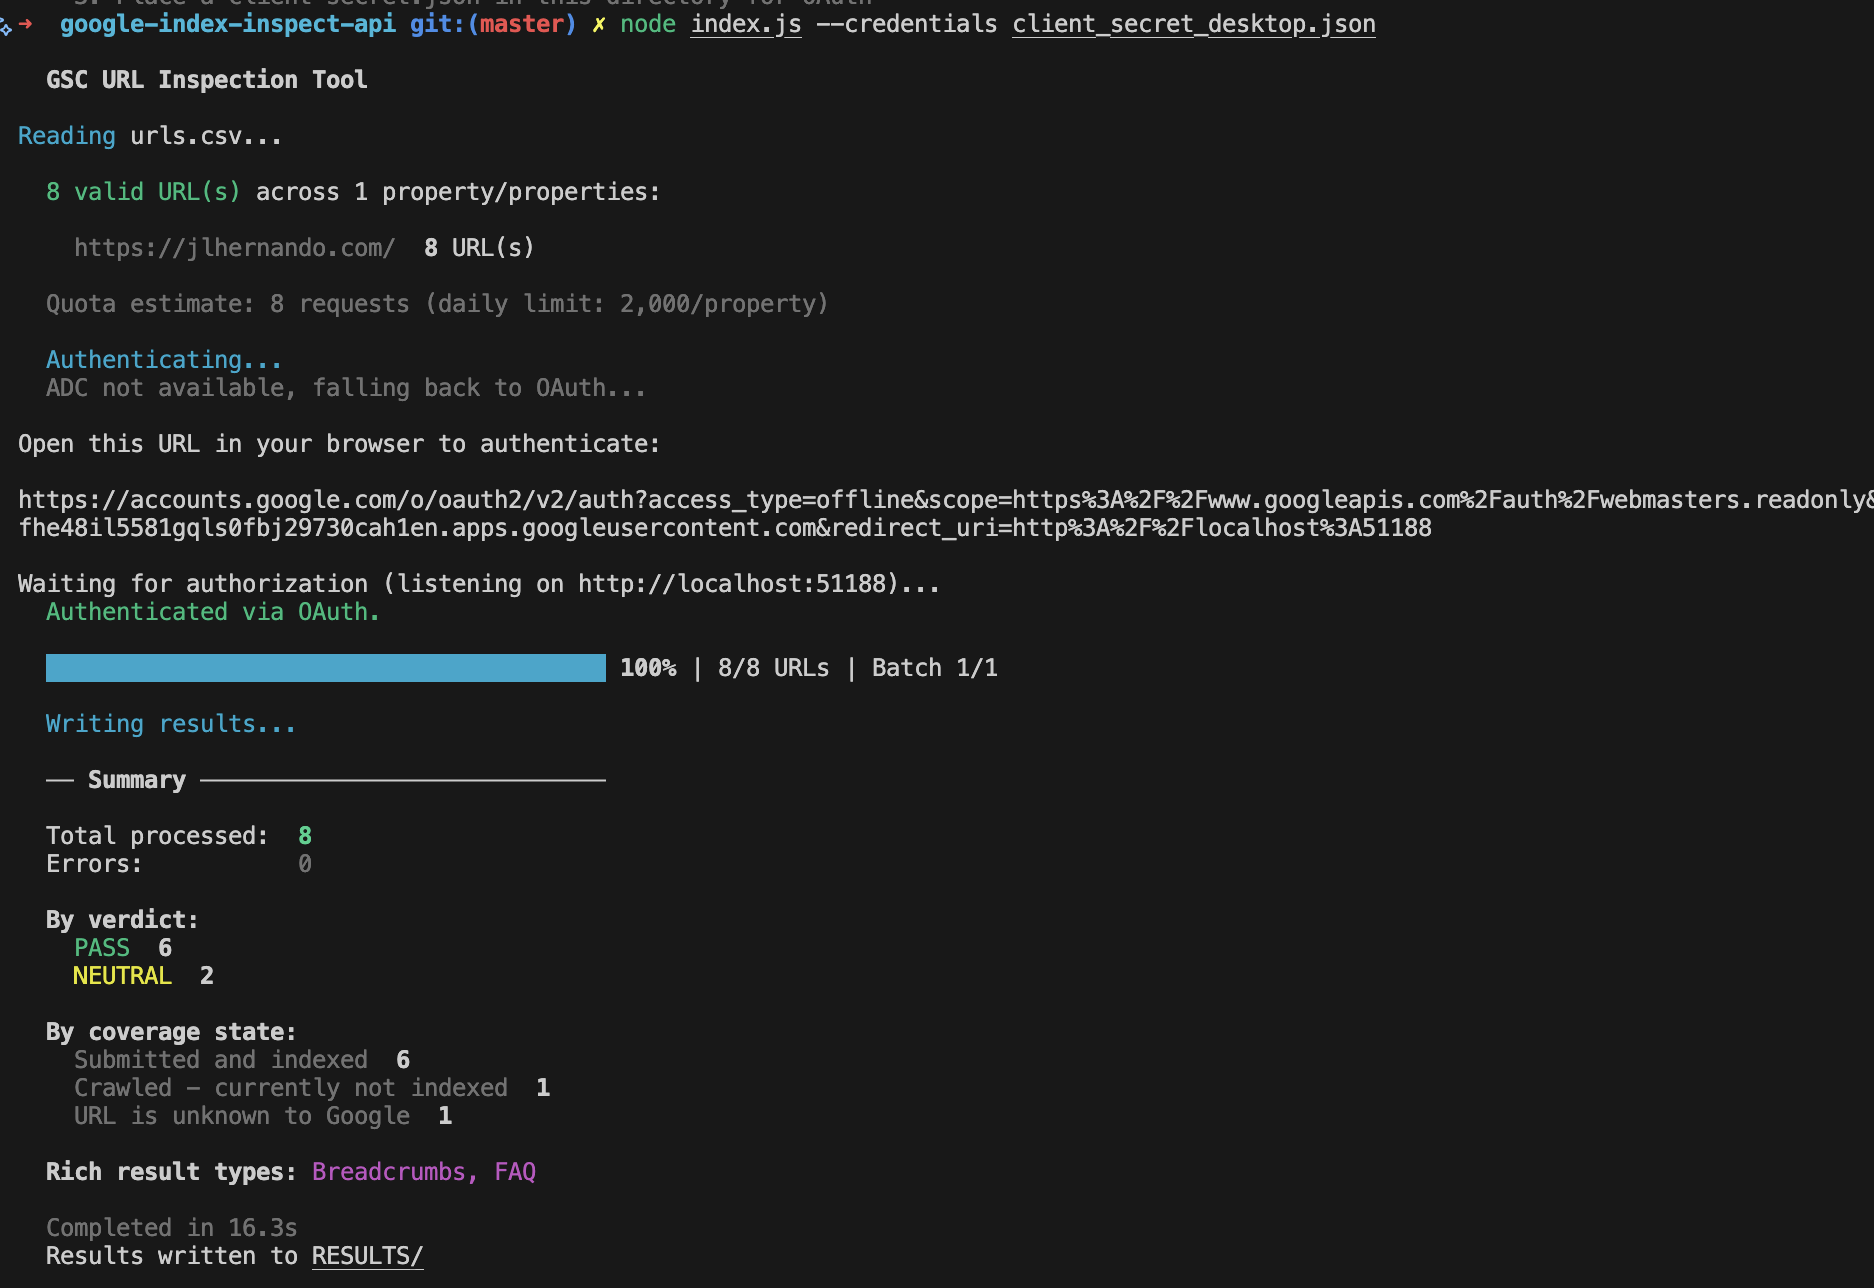](https://github.com/jlhernando/google-index-inspect-api)
### What changed vs the 2022 version
The single-file script is now a proper modular project. Auth, rate limiting, validation, output formatting, and checkpoint management all live in their own files under `src/`.
Authentication was one of the biggest upgrades. The original only supported OAuth with a web flow, which meant setting up redirect URIs and dealing with Google Cloud Console. Now there are three options: **OAuth with a desktop app** (recommended, simplest setup), **Application Default Credentials** (if you already use `gcloud` CLI), and **service accounts** (for CI/CD pipelines or cron jobs).
The tool is also much more resilient now. When the API returns a 429 or a 5xx, it retries automatically with exponential backoff instead of just crashing. A token bucket system enforces the 600 requests per minute per property limit, so you don't have to worry about hitting quotas yourself. And if a run gets interrupted (laptop dies, connection drops) you can pick up where you left off with `--resume` instead of reprocessing everything from scratch.
Beyond the basic coverage CSV, v2 generates separate reports for mobile usability, rich results, and AMP status. The raw JSON is saved too. It validates your input before making any API calls and gives clear error messages if something's off. There's a `--dry-run` mode to check everything without burning quota, and you can filter output with `--only-not-indexed` or `--filter-verdict FAIL` to focus on the URLs that actually need attention.
### Quick start
```bash
# Clone and install
git clone https://github.com/jlhernando/google-index-inspect-api.git
cd google-index-inspect-api
npm install
# Run with your OAuth credentials (see README for setup)
node index.js --credentials client-secret.json
# Or customise
node index.js --credentials client-secret.json --input my-urls.csv --output my-results --batch-size 10
# Resume an interrupted run
node index.js --resume
# Dry run to validate without API calls
node index.js --dry-run
```
The full list of options is in the [README](https://github.com/jlhernando/google-index-inspect-api#readme).
## The Claude Code acknowledgement
I want to be transparent about something: **I used [Claude Code](https://claude.ai/code) extensively for this rewrite**. If you've read my [previous post about Claude Code and Apps Script](/blog/claude-code-apps-script-seo/), you know I've been integrating it into my workflow.
The original 2022 script was entirely mine, written by hand, bugs 🐞 and all. For the v2, I used Claude Code as a pair programming partner. I directed the architecture, decided what features to build, and reviewed every change. Claude helped me write the actual code much faster than I could have alone.
Looking at the commit history, you can see it clearly. The repo went from a single initial commit in 2022 to a full modular rewrite in a single session. For me, absolutely mind bending how this is possible. Pure magic.
## Try it out
If you want the quick, zero-setup experience: **[use the web app](https://jlhernando.com/tools/free-bulk-google-index-inspect/)**. Sign in with Google, upload your URLs, and download the results.
If you prefer the terminal or need it for automation: **[grab the CLI from GitHub](https://github.com/jlhernando/google-index-inspect-api)**.
Either way, I'd love to hear if it's useful. Find me on [X @jlhernando](https://x.com/jlhernando) or [LinkedIn](https://www.linkedin.com/in/jose-luis-hernando-sanz/).
---
## My new stack for SEO Automation: Claude Code + Apps Script
- URL: https://jlhernando.com/blog/claude-code-apps-script-seo/
- Markdown source: https://jlhernando.com/blog/claude-code-apps-script-seo.md
- Published: 2026-01-15
- Summary: How Claude Code transformed my Apps Script SEO workflow. From debugging to building full features, the development experience is unrecognizable.
I'm a bit of a JavaScript automation nerd. I've [written about Node.js for SEO automation](/blog/how-to-install-node-for-seo/) a few times, but I've never really talked about Apps Script. It's powerful, but the development experience was always painful enough that I never felt like writing about it. That changed recently.
## The Problem with Apps Script development
If you've ever built anything in Google Apps Script, you might know the pain. The web editor is a bit basic although you can bypass it with [clasp](https://developers.google.com/apps-script/guides/clasp?hl=en), debugging is a nightmare, and you're constantly switching between tabs - BigQuery docs, Sheets API reference, Stack Overflow (or chatGPT), and your actual code.
I have a handful of Apps Script projects that I maintain for SEO reporting and other tasks. One of them queries BigQuery Bulk Export data, generates weekly trend analysis, builds deepdive reports, and emails executive summaries. It's about 1,500 lines of JavaScript that evolved organically over months.
Every time I needed to add a feature or fix a bug, I'd spend more time looking references than actually coding.
## Enter Claude Code
I started using [Claude Code](https://claude.ai/code) a few weeks ago, and it's changed everything about how I work with Apps Script.
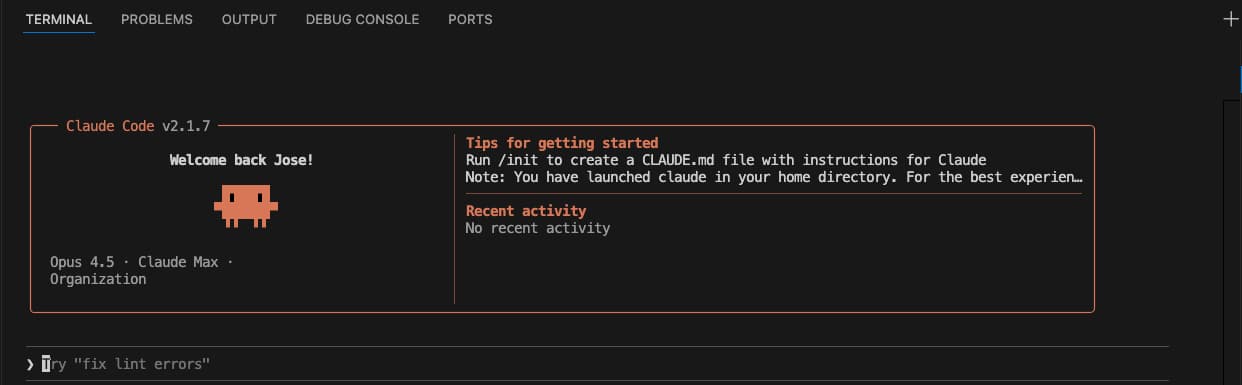
Here's what a typical session looks like now:
### Real Example: Catching up on missing weeks
I came back from the holidays and realised my weekly reporting script had missed Week 1 of 2026. Instead of manually figuring out what to backfill and writing SQL queries by hand, I just asked:
> "I'm starting this in week 2 of Jan, can I have a function that checks if weeks are missing and starts from the week missing?"
Within a minute, Claude Code had:
1. Read my existing `Code.js` file
2. Understood the data structure (ISO weeks, BigQuery queries, trend sheets)
3. Written a `catchUpMissingWeeks()` function that detects gaps and backfills them
4. Added it to the menu for easy access
The function it wrote:
- Reads existing weeks from the sheet
- Compares against what should exist (week 1 to current week)
- Backfills missing weeks in order using my existing SQL builders
No multi-tabs. No chatGPT. No "wait, what was that BigQuery date function again?"
### Catching bugs I didn't know existed
Right after running the catchup, I noticed something odd - data was appearing in columns beyond my headers. I mentioned it:
> "I'm getting data until AK column but headers until Y column - check what's the problem"
Claude Code immediately:
1. Compared my `getTrendHeader()` function (25 columns) against my (newer) SQL output (37 columns)
2. Identified that Brand Impressions and Non-brand Impressions headers were missing
3. Fixed the header array
This would have taken me 20 minutes of counting columns and cross-referencing SQL aliases. It took Claude Code about 10 seconds.
## What makes this different
I've tried ChatGPT/Codex for coding before. The difference with Claude Code is it gets it right the first try and fast.
It's not just autocompleting lines - it actually reads the files in your repo, understands your patterns, and makes changes that fit the existing codebase. When it added `catchUpMissingWeeks()`, it:
- Used my existing `backfillTrendWeeks()` pattern
- Added toast notifications consistent with other functions
It felt like working with someone who had actually read my code.
## My New Workflow
Here's how I approach Apps Script projects now:
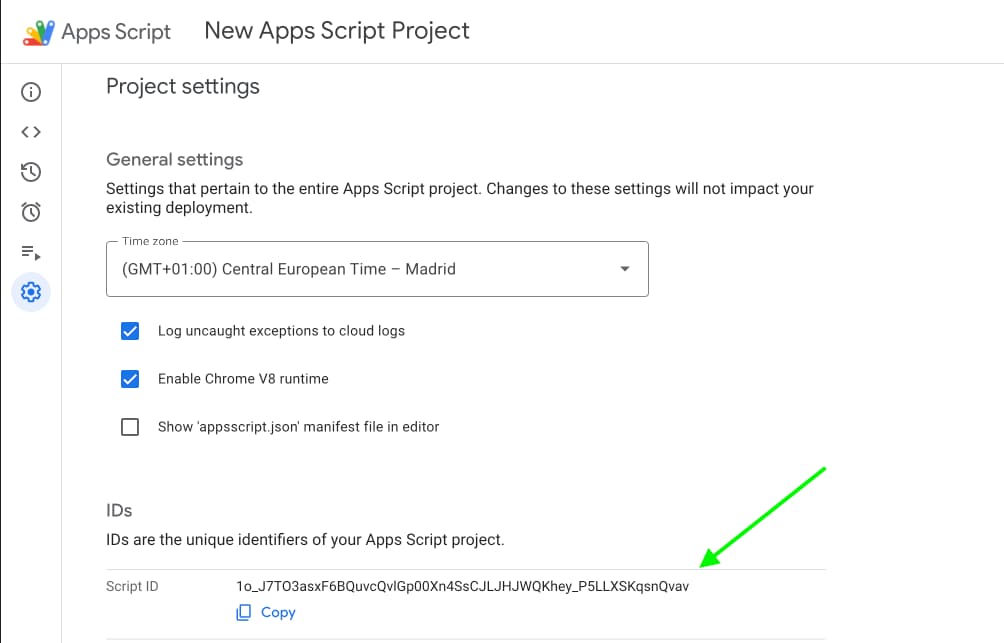
1. **Clone the project locally** using your IDE of choice (e.g. [VS code](https://code.visualstudio.com/)) with `clasp clone ` (only needed once per project). You can find the Script ID in the Apps Script editor under Project Settings:
2. **Open Claude Code** in the project directory with `claude`
3. **Describe what I want** in plain English
4. **Review and push** with `clasp push`
For complex features, I'll ask Claude Code to plan first. For quick fixes, I just describe the problem and let it dig in.
## Tips if you're getting started
**Be specific about your stack.** Claude Code reads your files, but telling it "this is Apps Script that queries BigQuery" helps it make better suggestions. Alternatively just use `/init` to create context for Claude. I recommend you to do it anyway.
**Let it read before it writes.** If you ask for changes to a file, it'll read it first. Don't interrupt - that context matters.
**Use it for debugging.** Paste an error message or describe unexpected behaviour. It's surprisingly good at tracing issues through your code.
**Trust but verify.** It's not perfect. Always review the changes before pushing - especially for anything touching production data.
## What's next
I'm planning to migrate more of my SEO scripts to this workflow. I have a few Node.js tools that could use some love, and Chrome extensions that need updating.
If you're building automation tools for SEO and haven't tried Claude Code yet, give it a shot. The time savings on Apps Script alone made it worth it for me.
---
Have questions or want to share your own experience? Find me on 𝕏 [@jlhernando](https://x.com/jlhernando) or [LinkedIn](https://www.linkedin.com/in/jose-luis-hernando-sanz/).
---
## Stop Doing Maths in Search Console’s Compare View
- URL: https://jlhernando.com/blog/search-console-compare-extension/
- Markdown source: https://jlhernando.com/blog/search-console-compare-extension.md
- Published: 2025-11-25
- Summary: Chrome extension that overlays absolute and percentage changes on Search Console's Compare view scorecards. No more mental math.
I love **Search Console’s Compare** view.
I hate doing the maths.
Every time I wanted to compare periods, I ended up copy/pasting numbers into a spreadsheet or doing mental arithmetic just to understand basic deltas. Fun the first time, boring the 50th.
So I built a tiny Chrome extension to scratch that itch.
## What it does
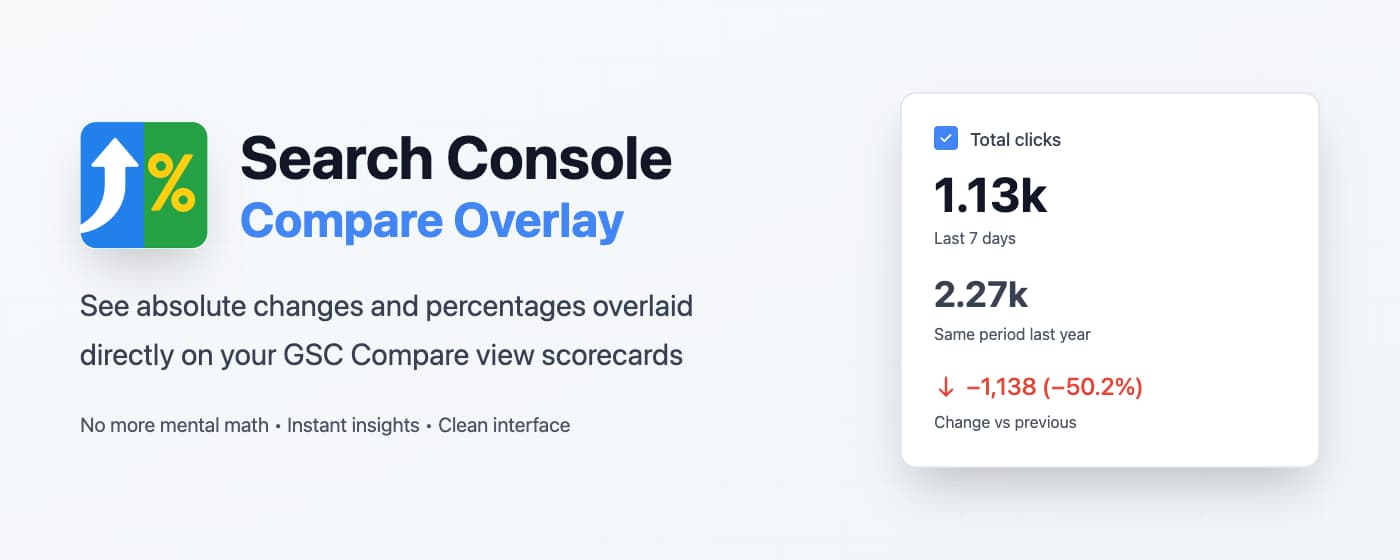
The **Search Console Compare Overlay** extension adds an extra layer of information directly on top of the Compare view scorecards:

- Absolute change per metric (Clicks, Impressions, CTR, Position)
- Percentage change per metric
- Follows the same “active / inactive” styling as Search Console
- Works automatically on the Compare view once installed
No exports. No formulas. Just open Compare view and read the numbers.
## Install it for free
[](https://chromewebstore.google.com/detail/search-console-compare-ov/ikbmphgcfdjlghegjfflphmkaemdflgf)
[Download from Chrome Web Store](https://chromewebstore.google.com/detail/search-console-compare-ov/ikbmphgcfdjlghegjfflphmkaemdflgf)
If you try it and have feedback or ideas for v2, I’d love to hear from you.
---
## URL Inspection API with Node.js: Bulk Index Status
- URL: https://jlhernando.com/blog/google-url-inspection-api-nodejs/
- Markdown source: https://jlhernando.com/blog/google-url-inspection-api-nodejs.md
- Published: 2022-01-31
- Summary: Check Google indexing status in bulk using the URL Inspection API endpoint from Search Console and Node.js.
For those of you that have read my blog before, you might have seen that I'm slightly obsessed with **getting index status data from Google**...
Up until now if someone wanted to get indexing information from Google Search Console, you would have to [automate the URL Inspection tool](https://jlhernando.com/blog/url-inspector-automator-node/) or [extract it in bulk from the Index Coverage Report](https://jlhernando.com/blog/index-coverage-extractor/) using a headless browser modules like Playwright or Puppeteer.
However, today our prayers have been answered!
The Google Search Console team [has released an official endpoint](https://developers.google.com/search/blog/2022/01/url-inspection-api#using-the-new-api) to use the **URL Inspection Tool from their API**!

In this blog post, I'll show you how you can **extract index status data in bulk** through this new endpoint using my [newly published script](https://github.com/jlhernando/google-index-inspect-api) in Node.js
## Before you run the script
Make sure that you have [Node.js](https://nodejs.org/en/) in your machine. At the time of writing this post I’m using version 16.4.2.
In this script I'm using a specific syntax that can only be used from version 14 onwards so double check that you are above that version.
```bash
# Check Node version
node -v
```
Download the script using git, Github’s CLI or simply [downloading the code from Github directly](https://github.com/jlhernando/google-index-inspect-api).
```bash
# Git
git clone https://github.com/jlhernando/google-index-inspect-api.git
# Github’s CLI
gh repo clone https://github.com/jlhernando/google-index-inspect-api
```
Then install the necessary modules to run the script by typing _npm install_ in your terminal
```bash
npm install
```
Update the `urls.csv` file with the individual URLs that you would like to check in the first column and the GSC property which they belong to. Keep the headers.
```csv
url,property
https://jlhernando.com/blog/how-to-install-node-for-seo/,https://jlhernando.com/
https://jlhernando.com/blog/index-coverage-extractor/,https://jlhernando.com/
```
Update the `credentials-secret.json` using your own OAuth 2.0 Client IDs credentials from your [Google Cloud Platform account](https://console.cloud.google.com/apis/credentials).

## Running the script from your terminal and expected output
To run the script from your terminal simply use the following command:
```bash
npm start
```
### Progress messages
If the script is able to authenticate you from the URLs and properties you are trying to check you will see a series of progress messages:

On the contrary if either your credentials don't match the set of URLs and properties you are trying to extract, you will receive a failed message and the script will stop.

### Expected output
If the script has been successful in retrieving index status data, you will have a `credentials.csv` file and a `credentials.json` file under the `RESULTS` folder (unless you have changed the name in the script).

If there are any extractions errors, these will be in another file named `errors.json`
This is very much an MVP and there are many optimisations that could be done, but it does the job. Remember that GSC has a limit of 2000 calls per day and 600 calls per minute, so only upload up to 2000 URLs in your `urls.csv` file.
I hope that you find this script useful and if you have any thoughts [hit me up on Twitter @jlhernando](https://twitter.com/jlhernando).
---
## Install Node.js for SEO Automation: Setup Guide
- URL: https://jlhernando.com/blog/how-to-install-node-for-seo/
- Markdown source: https://jlhernando.com/blog/how-to-install-node-for-seo.md
- Published: 2021-05-01
- Summary: Step-by-step guide to install Node.js and set up your laptop for JavaScript SEO automation. From zero to running scripts.
When I started programming in JavaScript in early 2020 I found lots of great resources to get up and running, but they were all focused on traditional web development. It was hard to find content specifically focused on using Node.js for SEO.
Hence, I've decided to put together a series of resources for anyone that wants to start their journey in Node.js for SEO and doesn't know where to begin. Today, we are going to start with the very basics: How to install Node.js and setup your laptop for JavaScript SEO Automation.
## Node.js installation
There are two ways to get Node.js on your machine. The simple way is just [downloading it directly from the official website](https://nodejs.org/en/) and installing it. However, there is a better, future-proof way using **Node Version Manager**.
Node.js ships a new release every few weeks, and the project now maintains two important release channels: **LTS** (recommended) and **Current** (latest features). As of late 2025, the latest **Active LTS** version is **Node 24**, while **Node 25** is the **Current** release.
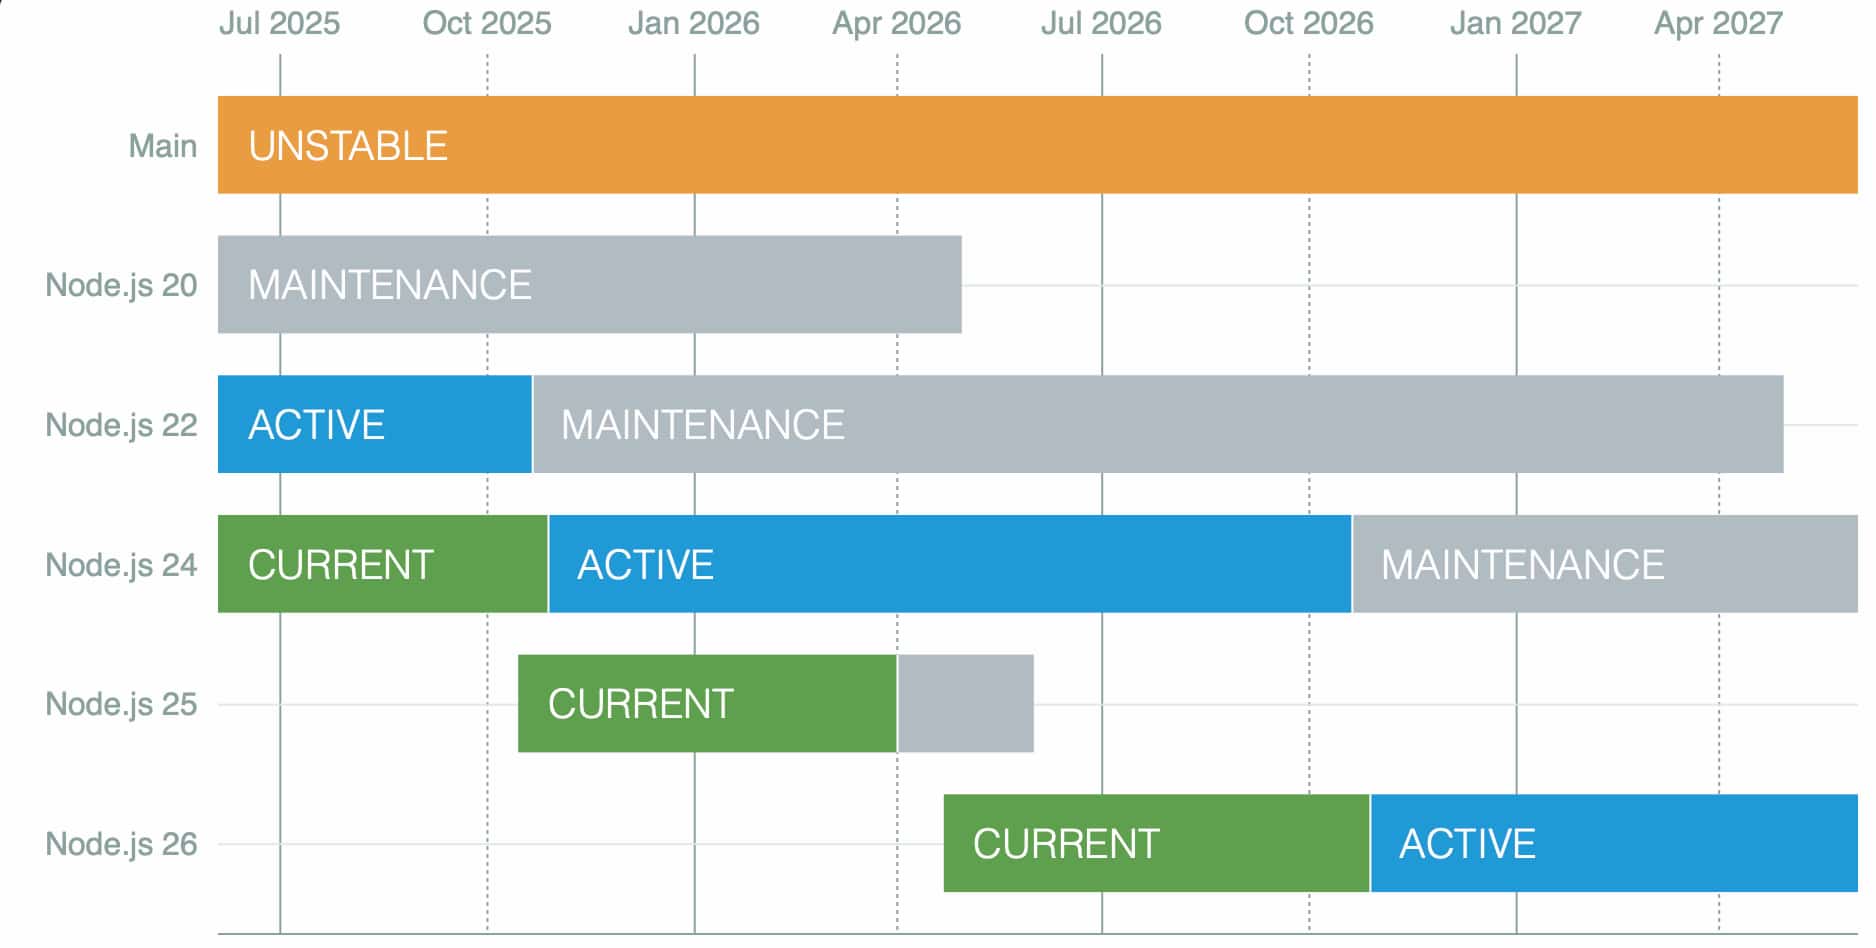
Official release [calendar from Node.js](https://nodejs.org/en/about/releases/)
Using a version manager ensures you can match whatever version your deployment environment supports.
### Installing Node Version Manager
Before installing NVM, uninstall any existing Node.js installation to avoid PATH conflicts.
#### macOS / Linux / WSL2
Install NVM using the official script:
```
curl -o- https://raw.githubusercontent.com/nvm-sh/nvm/v0.40.3/install.sh
```
or
```
wget -qO- https://raw.githubusercontent.com/nvm-sh/nvm/v0.40.3/install.sh
```
Restart your terminal so the `nvm` command becomes available.
#### Windows
Windows users can install **nvm-windows**, created by Corey Butler. Download the installer from [nvm-windows releases](https://github.com/coreybutler/nvm-windows/releases).
Remove any previous Node installation before installing nvm-windows.
### Downloading and using Node.js through NVM
#### macOS / Linux / WSL2
Install the latest LTS version:
```
nvm install --lts
```
Install the latest Current version:
```
nvm install node
```
Use a specific version:
```
nvm use 24
```
Check:
```
node -v
npm -v
```
#### Windows (nvm-windows)
Install the latest LTS:
```powershell
nvm install lts
nvm use lts
```
Or install the latest Current:
```powershell
nvm install latest
nvm use latest
```
## Installation of your Code Editor
The easiest way to build your scripts is using a Code Editor, also known as an IDE.
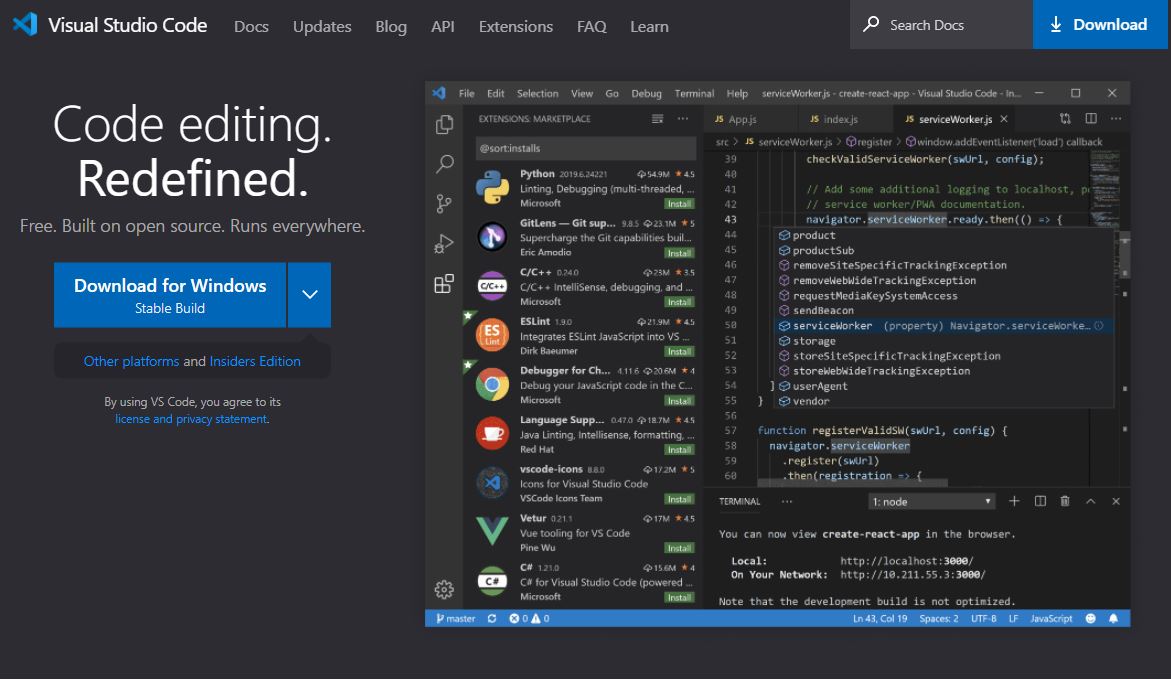
My recommendation is [Visual Studio Code](https://code.visualstudio.com/). Other options include [Sublime Text](https://www.sublimetext.com/) or [WebStorm](https://www.jetbrains.com/webstorm/). Atom was sunset in 2022 and is no longer maintained.
### VS Code Extensions
Below are some extensions that will make your JavaScript SEO workflow easier:
* **Bracket Pair Colorization** (built-in now, no extension required)
Enable via:
```json
"editor.bracketPairColorization.enabled": true,
"editor.guides.bracketPairs": "active"
```
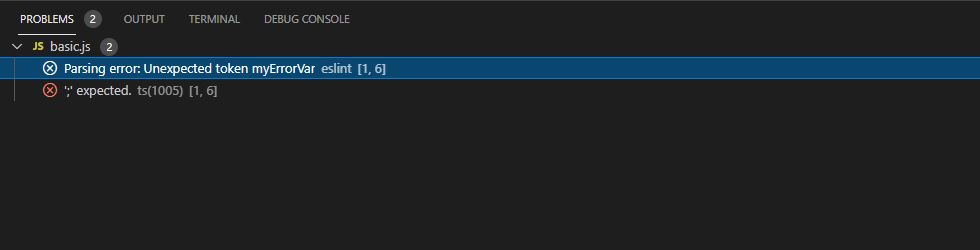
* **[ESLint](https://marketplace.visualstudio.com/items?itemName=dbaeumer.vscode-eslint)**
* **[Prettier - Code Formatter](https://marketplace.visualstudio.com/items?itemName=esbenp.prettier-vscode)**
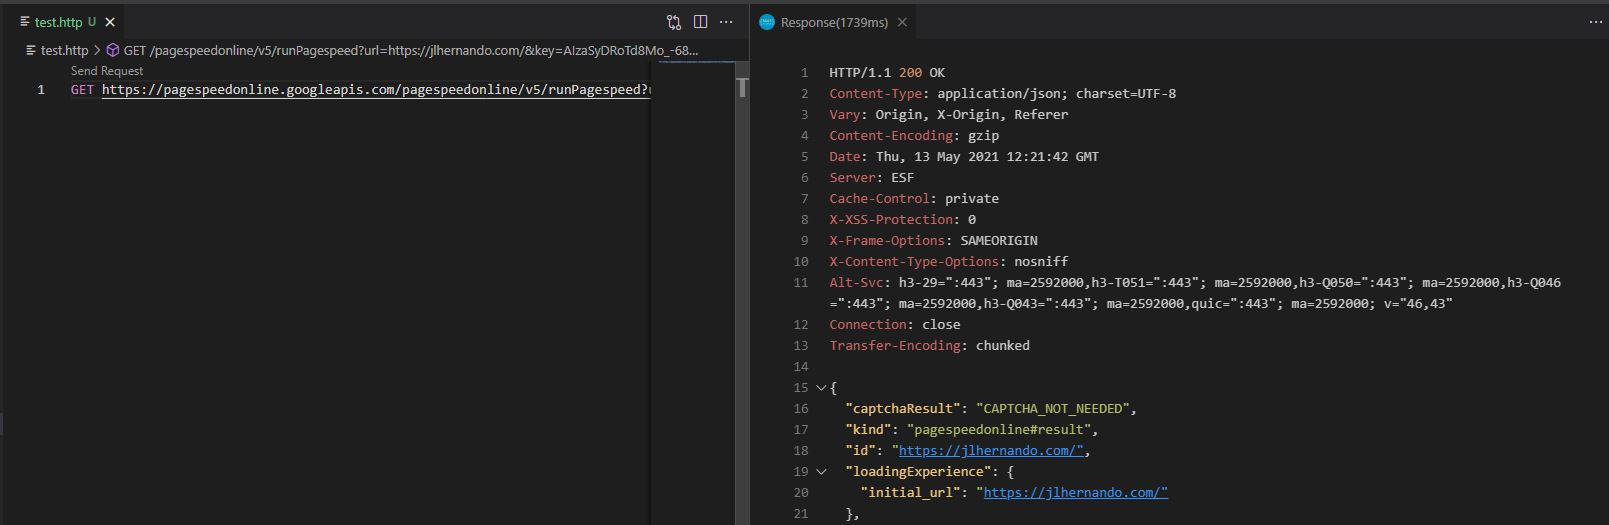
* **[REST Client](https://marketplace.visualstudio.com/items?itemName=humao.rest-client)**
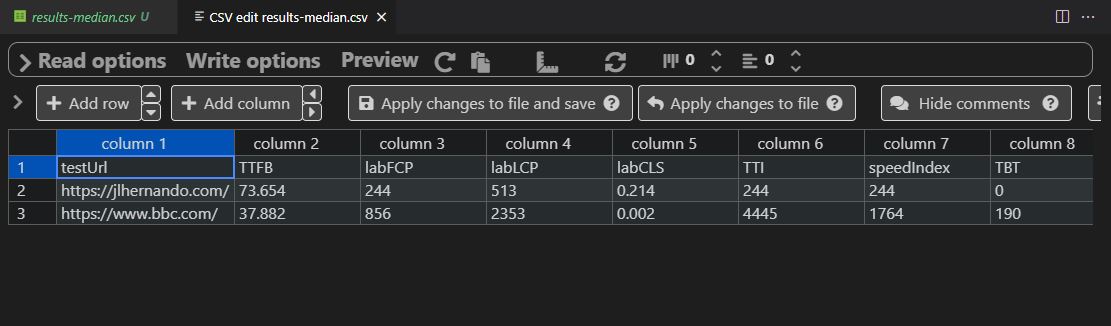
* **[Edit csv](https://marketplace.visualstudio.com/items?itemName=janisdd.vscode-edit-csv)**
## Install new terminal for windows users (optional)
If you're using Windows, I recommend downloading [Git For Windows](https://gitforwindows.org/). It includes Git and a Bash emulator.
For an even more complete Linux environment, you can install **WSL2**, which supports Node.js and NVM just like macOS/Linux.
## Create and Run your first Node.js script
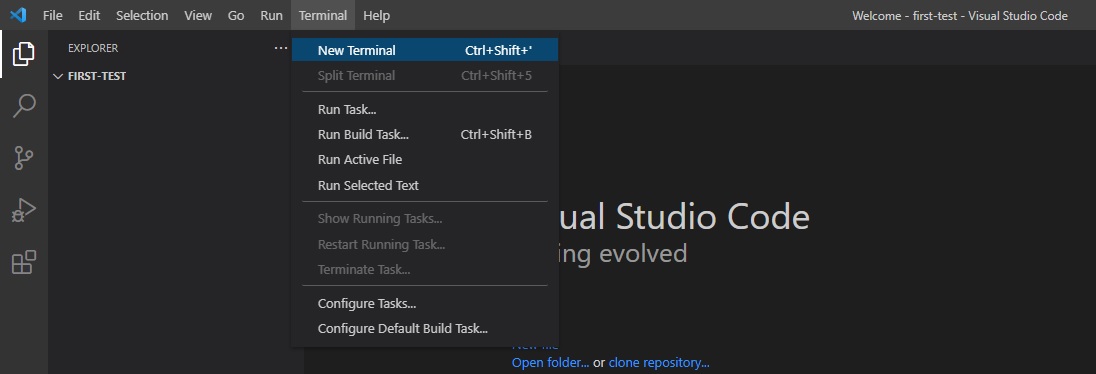
Open a new terminal from VS Code.
Create a folder:
```
mkdir first-test
```
Open it in VS Code:
```
code first-test
```
### Starting your first JavaScript file
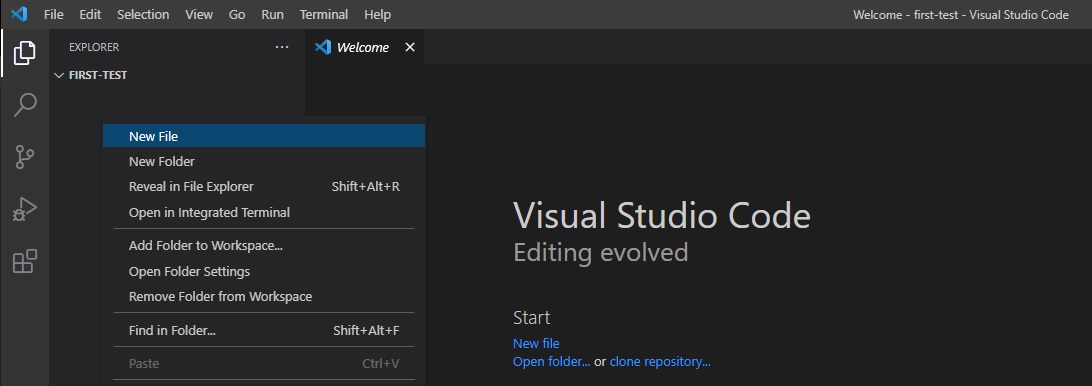
Right-click the sidebar -> **New file** -> create `index.js`.
Add the following:
```js
console.log("JavaScript rules!")
```
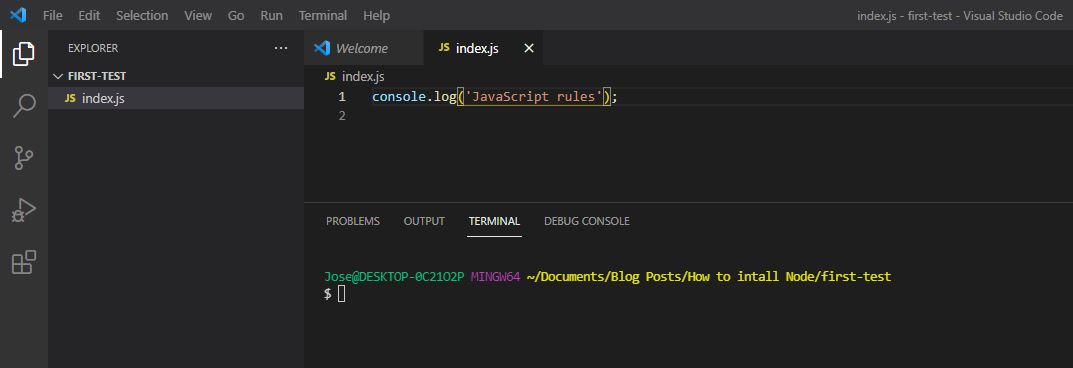
Run it:
```
node index.js
```
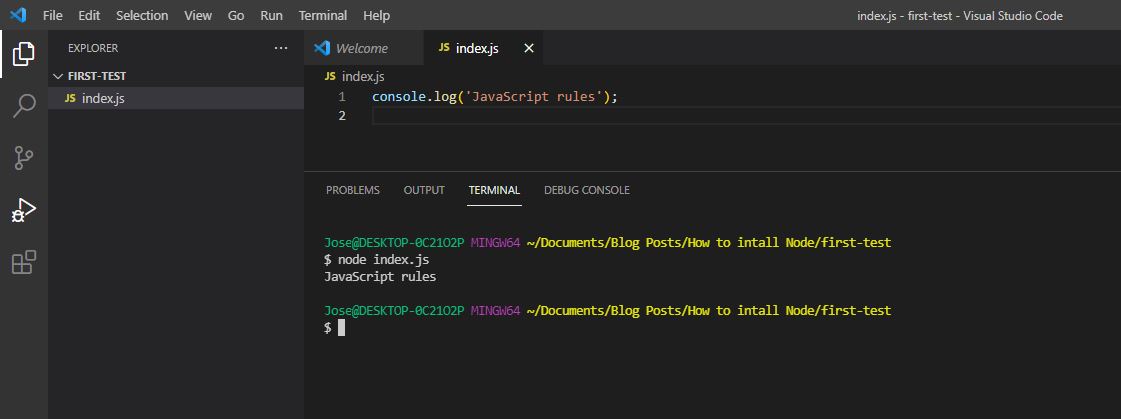
Congratulations! You've just created your first Node.js script!
If you liked this intro to Node.js or have any questions, please hit me up on [Twitter](https://twitter.com/jlhernando).
---
## Bulk Index Coverage Extraction with Node.js
- URL: https://jlhernando.com/blog/index-coverage-extractor/
- Markdown source: https://jlhernando.com/blog/index-coverage-extractor.md
- Published: 2021-03-14
- Summary: Node.js script to download Index Coverage Report stats from Google Search Console in bulk. Automate what GSC makes manual.
**Update:** I've built a new version of this tool, including a Chrome extension. [Read about it here](/blog/gsc-index-coverage-extractor/).
In my previous article I talked about how to [get indexing information in bulk from Google Search Console](https://jlhernando.com/blog/url-inspector-automator-node/) using the URL Inspection Tool and Node.js. This tool is great to gather individual information about specific URLs in your site. However, Google also provides site owners with a more holistic view of the indexing status of their sites with the Index Coverage Report.

You can check [Google’s own documentation](https://support.google.com/webmasters/answer/7440203?hl=en) and [video tutorial](https://www.youtube.com/watch?v=L0UqvdHJaXE) to understand in more detail the data this section provides, but at a very top level the key data points are:
1. **The amount of pages that Google has indexed.**
2. **The amount of pages that Google has found but has not indexed (either because of an error or purposefully excluded).**
3. **How big your site is from Google’s point of view (Valid + Excluded + Errors).**
Right now there are four main categories: **Errors**, **Valid with warning**, **Valid** and **Excluded** subdivided into 29 subcategories. Each of these subcategories provide an additional level of classification to help site owners and SEOs understand why your URLs belong in the main category. Not all subcategories will be visible, only the ones that apply to your site.

Unfortunately, the export option on the Index Coverage Report view (pictured above) only gives you the top level numbers per report. If you want to know and export which URLs are inside the multiple reports, you have to click on each report and export them one by one.

This way to extract the data is very manual and time consuming. Hence, I decided to automate it with Node.js and add it a few more features.
## Installing and running the script
Make sure that you have [Node.js](https://nodejs.org/en/) in your machine. At the time of writing this post I’m using version 14.16.0. In this script I'm using a specific syntax that can only be used from version 14 onwards so double check that you are above that version.
```bash
# Check Node version
node -v
```
Download the script using git, Github’s CLI or simply [downloading the code from Github directly](https://github.com/jlhernando/index-coverage-extractor).
```bash
# Git
git clone https://github.com/jlhernando/index-coverage-extractor.git
# Github’s CLI
gh repo clone https://github.com/jlhernando/index-coverage-extractor
```
Then install the necessary modules to run the script by typing _npm install_ in your terminal
```bash
npm install
```
In order to extract the coverage data from your website/property update the credential.js file with your Search Console credentials.

After that use your terminal and type _npm start_ to run the script.
```bash
npm start
```
The script logs the processing in the console so you are aware of what is happening.

Like in the [URL Inspection Automator](https://github.com/jlhernando/url-inspector-automator-js), the script uses [Playwright](https://playwright.dev/) and runs in headless mode. If you want to see the browser automation in action, simply change the launch option to _headless: false_ in the index.js file and save it before running the script.

## The output
The script will create a "coverage.csv" file and a "summary.csv" file.
The "coverage.csv" will contain all the URLs that have been extracted from each individual coverage report.

The "summary.csv" will contain the amount of urls per report that have been extracted, the total number that GSC reports in the user interface (either the same or higher) and an "extraction ratio" which is a division between the URLs extracted and the total number of URLs reported by GSC.

I believe this extra data point is useful because GSC has an export limit of 1000 rows per report. Hence, the "extraction ratio" gives you an accurate idea of how many URLs you have been able to extract versus how many you are missing from that report.
## Future updates
There are a few features that I think would be really nice to have for future releases. For example, extract the "update" date and modify the script as a Google cloud function to store the data in BigQuery only if the date is different to the previous date stored.
I know other SEOs are doing this kind of extraction already using Google Sheets which is very cool so I might give that a try. In the meantime, I hope that you find this script useful and if you have any thoughts [hit me up on Twitter](https://twitter.com/jlhernando).
---
## Automating URL Inspection with Node.js
- URL: https://jlhernando.com/blog/url-inspector-automator-node/
- Markdown source: https://jlhernando.com/blog/url-inspector-automator-node.md
- Published: 2021-02-06
- Summary: Automate Search Console's URL Inspection Tool with Node.js. Based on Hamlet Batista's original script, extended for bulk processing.
The URL Inspection Tool is one of the most useful reports from the newest version of Google Search Console. There is so much [great information to unpack](https://support.google.com/webmasters/answer/9012289?hl=en) and to debug your presence in Google Search. But at a fundamental level, it answers two important questions:
1. **Has Google found a specific URL from my site?**
2. **Is that URL indexed?**

The main problem is that it is a very manual process to gather this information, as there is no “bulk option” and no API access. Additionally, there is a “daily request limit” per property. Meaning that you won’t be able to get over 100 URLs per property, per day. Hence, if your sites are bigger than 100 URLs you will need multiple days to extract this data [or use other methods outside of GSC](https://builtvisible.com/scaling-google-indexation-checks-with-node-js/).
Although I don’t use the URL Inspection tool every day, it definitely gives me a peek into how Google sees a small section of my sites. However, I didn’t build this script to help me out with my workload. I’ve built it because I wanted to improve [another open source project](https://github.com/ranksense/url-inspector-automator) from a person I respect deeply, but when he launched it I didn’t have the coding abilities to do so. That person is the great [Hamlet Batista](https://twitter.com/hamletbatista) who unfortunately passed away only a few days ago (January 2021).
I am not going to lie, this is mostly an exercise for me to channel my grief. To express my appreciation for the teacher and the man that Hamlet was, and of course, to share with the SEO Community. Because I think that’s what Hamlet wanted from us. To share and improve together.
I’ve divided this post into four parts so it’s your choice to read it all or jump to the specific part you’re interested in:
1. [Why have I built this script](#why-built)
2. [How does the script work](#how-does-the-script-work)
3. [How to install and run the script](#how-to-run-script)
4. [Final thoughts](#final-thoughts)
## Why have I built this script
Back in April 2019, Hamlet Batista wrote an article in SEJ called “[How to Automate the URL Inspection Tool with Python & JavaScript](https://www.searchenginejournal.com/automate-url-inspection-tool-python-javascript/301639/)”. I was fascinated by the tool, as I didn’t know about any solutions that could extract this data programmatically. But mostly I was impressed by how easily Hamlet explained the way he created the script.
After a few tests, I found a couple of potential bugs and I wrote to Hamlet to see if he encountered the same issues. Even though we didn’t know each other before and I am a nobody in the SEO community, he was kind enough to reply:

Back then, I started to learn some JavaScript, and had zero experience with Python. After trying for a while, I gave up trying to modify his script in Python because I didn’t know what I was doing. But because he was using Puppeteer, a JavaScript library, I figured I could replicate his script using JavaScript.
This seemingly arbitrary challenge made me focus all my energy on learning JavaScript so one day I could improve the script he built and add my small grain of sand to his contribution.
Fast-forward to December 2020, Hamlet and I had a Zoom call to talk about collaborating in his [\#RSTwittorial](https://twitter.com/hashtag/RSTwittorial?src=hashtag_click) series and I had a few ideas that I wanted to share with him, including the JS version of his script that I built a long time ago but I thought it wasn’t good enough to share.
When I showed him he was so happy that I tried to do it on my own, and although we agreed on using another script for the future [\#RSTwittorial](https://twitter.com/hashtag/RSTwittorial?src=hashtag_click) webinar, he encouraged me to share it with the SEO community. So I agreed with him to share it at the same time I was going to do the webinar (April 2021). That way I could share two of my scripts and hopefully fix a few of the features I had in my backlog for the JS version of his script.
Hamlet was that kind of man, he encouraged you to believe in yourself.

My experience wasn’t unique by any means. He shared the work of so many people in his articles. He always commented on the work people shared on Twitter. Even after he passed, I could read it on all the messages people wrote on twitter about him, the [wonderful article Lilly Ray wrote on SEJ](https://www.searchenginejournal.com/a-tribute-to-hamlet-batista/394049/) and later on I heard similar testimonials in the memorial Lilly put together to honour him.
I think it’s no secret that he was a big believer in making our industry smarter by showing other people what could be done with programming. Especially using his favourite language Python, and motivating others to do bigger and better things. [Maura Loew](https://twitter.com/mauraloew), who runs Operations at [Ranksense](https://www.ranksense.com/) and worked really closely with him, said in the memorial that 5 years ago, Hamlet told her that he wanted to start a movement in the SEO industry. And he sure did!
I want to be part of that movement. One where we are kinder and elevate each other. Where we aren’t afraid to learn publicly and share our experience building scripts or simply just doing SEO better so we can collectively get smarter.
With all that said, here is what I promised. I hope you like it!
## How does the script work
Although Puppeteer was my first choice, I wanted to try something new that could do the job but allowed a few more configuration options. Meet [Playwright](https://playwright.dev/), a Headless-browser library for Node.js built by a few former members of the Puppeteer team that now work at Microsoft.

It works similarly to Puppeteer but one of the key differences is that it allows you to use different browsers, like Firefox.
The mechanism of the script is quite simple. There are two files that you need for the script to work:
1. A “urls.csv” file containing a list of urls from a site that it’s verified in your Search Console account.
2. Update the “credentials.js” file with the email address you use for Search Console, the password, and the URL from the property you’d like to check.
### Create a “urls.csv” file
You can create this directly on your IDE of choice or simply create it on Excel and save it in the same folder where the script is. Add the URLs that you would like to check into the file and make sure that they are from the same GSC property.

### Update the credentials.js file
For the script to work, you need to add your Google Search Console credentials. Edit the variables with your email, password and URL/property that you would like to check and you are ready to go.

## How to install and run the script
First, make sure that you have [Node.js](https://nodejs.org/en/) in your machine. At the time of writing this post I’m using version 14.15.4 but it should work with most versions.
Download the script using git, Github’s CLI or simply [downloading the code from Github directly](https://github.com/jlhernando/url-inspector-automator-js).
```bash
# Git
git clone https://github.com/jlhernando/url-inspector-automator-js.git
# Github’s CLI
gh repo clone https://github.com/jlhernando/url-inspector-automator-js
```
Then install the necessary modules to run the script by typing _npm install_ in your terminal
```bash
npm install
```
Once you have it on your machine, make sure you have followed the steps in the previous section. Create the list of URLs you want to check and that you have updated the credential.js file with your Search Console credentials. After that use your terminal and type _npm start_ to run the script.
```bash
npm start
```

By default, the script runs in headless mode, but if you’d like to see the script in action like in the example above, simply change the launch option to _headless: false_.

### The output
When the script has finished, you will see two new files in your folder: a “results.csv” file and a “results.json” file. Both files will contain the following information but in different formats for convenience:
- \- The index state of your URL as reported by GSC (Coverage).
- \- The description of the index state.
- \- The last reported date & time Googlebot crawled your URL.
- \- If the URL was found in your XML sitemap.
- \- The referring pages Googlebot found linking to your URL.
- \- The Canonical URL declared by the canonical tag in your page (if any).
- \- The Canonical URL Google has chosen.
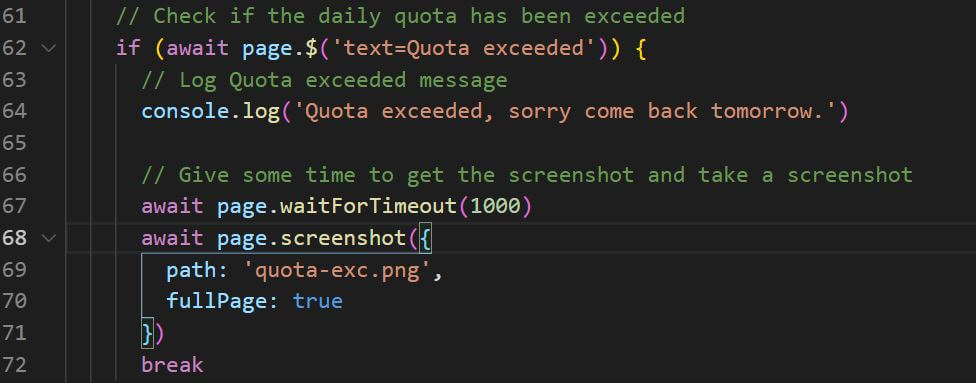
There is one more thing that you may see if you try to check more than 100 URLs. A screenshot of the “quota exceeded” message from Search Console:

This small condition is exactly what I wanted to change in Hamlet’s code but I couldn’t. I finally understood what was necessary to create it.

## Final thoughts
I’d like to think that Hamlet would be happy to see how I ended up contributing to his script and shared it with the community. I think I have been holding back on sharing because deep down I believe I can always make things better. And mostly, it is true.
You can always make things better. However, we need to accept, as individuals, we are limited by time, knowledge, and experience. Sharing can also be scary, as it opens you to vulnerability and potential ridicule. But I prefer taking a page from Hamlet’s book and start sharing more. Because by sharing you put extra effort in understanding how things work. You can contribute to other people’s work and motivate them to also build and share new things, including contributing to your own ideas.
I hope you find this script useful, and that you’ll join the movement too. Learn more, build more, share more. [**#DONTWAIT**](https://twitter.com/hashtag/DONTWAIT?src=hashtag_click)
If you want to read about everything that Hamlet wrote and created, there is a new platform created by [Charly Wargnier](https://twitter.com/DataChaz) called [SEO Pythonistas](https://www.seopythonistas.com/) that I’d recommend you to check.
Also, don’t forget to check out his company [Ranksense](https://www.ranksense.com/), an innovative way to do SEO changes faster using Cloudflare workers.
---